Pages 5–15 · Markdown
Chapter 1 – Basic Programming Concepts
Introduction
If you read through the Quick Start Guide, included with your new ZX Spectrum Next, you've already had a brief introduction of the screen, keys, editing and NextBASIC in general which means you're ready to start programming your computer! If not, you can either go along and you'll figure things you've missed along the way – or – go back and have a quick read of the A (Next)BASIC Primer section! Either way, you need to reset your ZX Spectrum Next, go to the Startup Menu and select NextBASIC. Press ENTER and we're ready to start!
PRINT, LET, programs and line numbers
Type in the following two lines:
20 PRINT a
10 LET a=10
so that the screen looks like this:
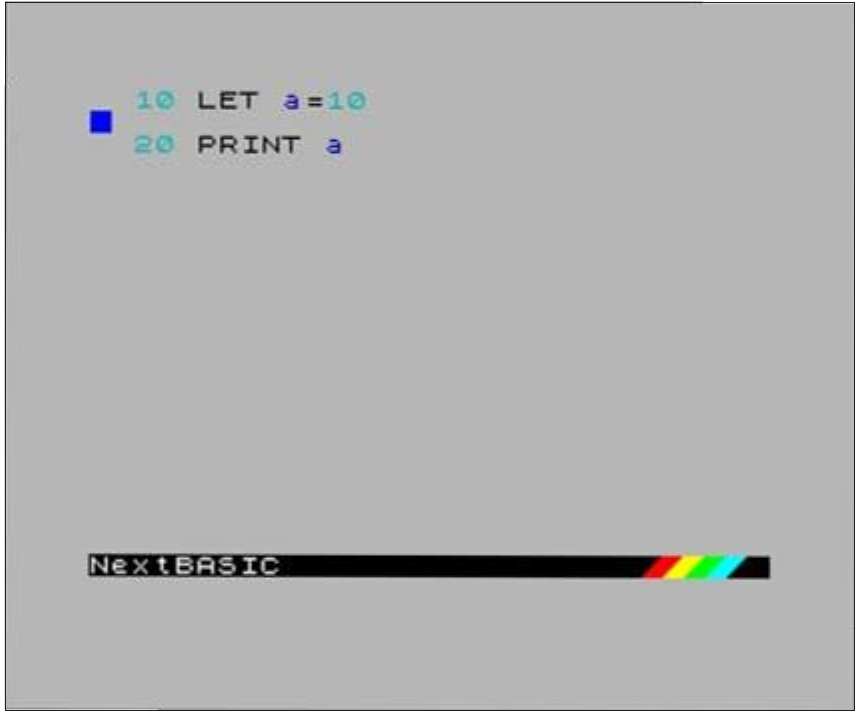
10 LET a=10
20 PRINT a


NextBASIC
Fig. 1 – Entering program lines in NextBASIC
First of all congratulations! You just wrote a computer program which stores a number in the computer's memory, later recalls it and displays it. Let's see for a moment exactly how you've done that:
- Since these lines began with numbers (as you already know from the Quick Start Guide), they were not obeyed immediately but stored as program lines. You will also have noticed here that the respective line numbers govern the order of the lines within the program: the lower the number the earlier (higher in the list) it appears. This matters most when the program is run, but it also governs the order of the lines that you see on the screen now.
- By using the command LET you've instructed the computer to await an assignment – the assignment itself is indicated by the = (equals sign). Assignment is the pairing of the numeric value 10 to a variable named a.
Let's enhance our program a bit more. Type:
15 b=15
and press ENTER. Line 15 gets inserted between lines 10 and 20 and the screen is reformatted. If the lines' numbers had only an interval of 1; if for example they had been numbered 1 and 2 instead of 10 and 20 it would have been impossible to insert another line in-between. Line numbers must be whole numbers between 1 and 9999, and that is why,
when first typing-in a program, it is good practice to leave large enough intervals in-between the numbers.
You'll also notice, that for line 15 there's no LET keyword although the = remains. That is because LET is optional and it's implied from the assignment alone. Functionally therefore, lines 10 and 15 are identical. For this chapter, we will keep using LET so you can see the assignments clearly but further on, we will skip them altogether as they make for much more readable code.
Note here that we will do the same with the printed representation of Syntax Highlighting as it requires a contrast with the background which a printed manual doesn't provide.
Variables and Arrays
Before we continue further, let's take a pause and discuss what the letters a and b in the examples above are called. We call these variables because they represent locations in the computer's memory where we can temporarily store information to be recalled and used at any time a program is being executed. There are two types of variables by usage: Global and Local. Global variables apply to an entire NextBASIC program and these are the ones we will talk about here. Local variables, apply only to subprogram areas we call procedures and functions and they will be discussed in the respective chapters.
NextBASIC can store two types of information in memory: numbers and text. Numbers are further separated into floating point and integers. Text variables are called strings and they will be discussed in Chapter 7. Furthermore, NextBASIC can group together variables of the same type and refer to them collectively. These groupings are called arrays.
There are some restrictions in the naming and quantity of available variables and arrays as you can see in the following table according to their type. It is advisable to make use of integer variables over their regular numeric counterparts despite their restrictions1 at least where speed of execution is concerned.
| Integer variables | Numeric variables | String Variables | |
|---|---|---|---|
| Qty | Fixed 26 | Limited only by memory | Limited only by memory |
| Naming | Single character prefixed by the % symbol | Combination of characters and numbers | Combination of characters and numbers suffixed by the $ symbol |
| Arrays | Fixed 26 with maximum 64 elements (0...63) Extensible size and dimensions (by reducing the number of available arrays) |
Limited only by memory (Indices are 1-based) |
Limited only by memory Indices are 1-based) |
Table 1 – Types of NextBasic variables
Assignments
We saw earlier that using LET with a variable together with the symbol = and some value is called an assignment. What actually happens is that LET instructs NextBASIC to move a value (numeric or character) into a location in the computer's memory which we can later identify and recall by an easy-to-use name (See Table 1 above). Unlike previous versions of Sinclair BASICs that required the LET command and only allowed a single LET command per assignment, NextBASIC allows the omission of the LET keyword altogether (as the assignment operator = implies its use anyway) while, at the same time, multiple assignments of variables per LET command. In other words, the full form of LET is:
[LET] variable1 [,[variable2....variablen]] = value1[,[value2...valuen]]
Moreover, assignments allow multiple destinations and a mix of types of value and variables. Some examples of the above are:
LET x,y=10,20
1 Integer variables in NextBASIC are 16-bit (unsigned or signed). That means that they accept values from 0 to 65535 (or from -32768 to 32767)
x,y=10,20
which are equivalent, or in a more descriptive manner:
LET numberA,numberB,stringA$,stringB$ =
1,2,"hello","goodbye"
One, extremely handy functionality of assignments is that in the case of assignment of multiple variables, if there are fewer values after the = operator than the variables before it, then all the remaining variables get initialised to that specific value. The following line:
a,b,c,d,e,f=0
will create variables a, b, c, d, e and f and set them all to 0. Similarly the following line:
a,b,c,d,e,f=10,20,30,1
will assign 10 to variable a, 20 to variable b, 30 to variable c and 1 to variables d, e and f. In the example above we could remove altogether line 10 and instead enter:
15 a,b=10,15
which is functionally equivalent to both lines 10 and 15!
Finally, assignments can be made cumulative with the use of special combination operators as seen in the table below:
| Assignment Operator | Numeric Variables | String Variables |
|---|---|---|
| += | Increases variable by the value assigned | Concatenates string variable with the string assigned |
| −= | Decreases variable by the value assigned | – Not Applicable – |
| *= | Multiplies variable by the value assigned | Replicates the string variable as many times as the numeric value assigned |
| /= | Divides variable by the value assigned | – Not Applicable – |
| ^= | Raises variable to the power assigned | – Not Applicable – |
| &= | ANDs variable with the value assigned | – Not Applicable – |
| |= | ORs variable with the value assigned | – Not Applicable – |
| ^|= | XORs variable with the value assigned | – Not Applicable – |
| <<= | Shifts left the variable as many positions as the value assigned | – Not Applicable – |
| >>= | Shifts right the variable as many positions as the value assigned | – Not Applicable – |
| MOD= | Performs a MODulo operation on the variable with the value assigned | – Not Applicable – |
Table 2 – Accumulation assignments
This allows us to be a bit more terse when writing a program by reducing the amount of text we have to type, making for some more readable code. Consider the following example:
10 LET a=10
15 LET b=15
20 LET c=a
30 LET a=a+b
40 LET b=b+c
Using the information we've just learned, we can rewrite it to use multiple assignment statements as well as cumulative assignment operators like so:
15 a,b=10,15
20 a,b+=b,a
It's obvious from the example above that after skipping both the LET keyword and the long form of assignment, our program suddenly became more readable and much easier to write!
Labels
Apart from the line numbers (which we will see how to refer – and jump to – in the following sections) sometimes we need a way to identify and/or jump to a selected NextBASIC statement, maybe even within a multi-statement line. For this reason, NextBASIC provides us with a facility called labels. Labels are identified by the at (@) symbol prefix and a name following the naming guidelines for a procedure (See Chapter 4) and they are defined within a program starting with either the line number or the colon statement separator ( : ) if they're not defined at the start of a line. Their definition can appear anywhere within a program:
20 @onelabel: PRINT a+b
30 PRINT a+b: @anotherlabel
Labels can be used in lieu of line numbers with the following keywords: GO TO, BANK...GO TO, GOSUB, BANK...GOSUB, LIST, BANK...LIST, SAVE...LINE2 and EXIT. See relevant section for each keyword's proper syntax. BANK commands are all discussed in length in Chapter 23 – The Memory
Using LIST, RUN and cursors to edit and run programs
Going back to our program, you will need to change line 20 to:
20 PRINT a+b
You could type out the replacement in full, but it is easier to move the cursor (using the cursor keys) to just after the a, and then type:
+b (without ENTER)
The line at the bottom should now read:
20 PRINT a+b
Press ENTER and it will replace the old line 20, so that the screen looks like this:
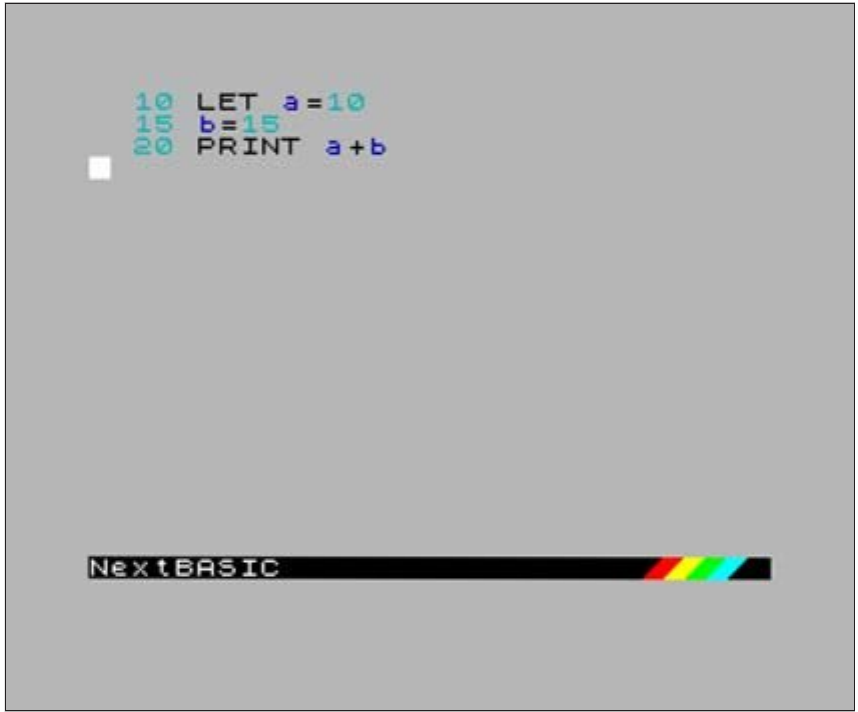
10 LET a=10
15 b=15
20 PRINT a+b


NextBASIC
Fig. 2 – Editing a program
2 In the case of SAVE...LINE@label, the saved program will autostart from the beginning of the line that contains the label even if it's not the first statement in the line ²
Run this program using RUN and ENTER and the sum will be displayed (25). Run the program again and then type:
PRINT a, b
The variables are still there, even though the program has finished. If you enter a line by mistake, say:
12 b=8
it will go up into the program and you will realise your mistake. To delete this unnecessary line, type:
12 (with ENTER of course)
Line 12 will disappear, and the cursor will appear where line 12 used to be.
Now type:
30 (and ENTER)
This time, the program cursor will appear after the end of the program (having tried to find line 30 and failed). If you enter any line number that does not exist, NextBASIC's Editor will place the cursor where it thinks the line would have been if it existed. This can be a useful way of moving around large programs, but beware – it can be very dangerous because if the line really did exist before you entered the number, it wouldn't exist afterwards (refer to the line 12 example above)!
To list a program on screen, type
LIST
and press ENTER. You may wish to list a program from a certain point onwards. This can be achieved by typing an appropriate line number after the LIST command. Try
LIST 15 (and ENTER)
to see this in action. If, at some point, you find you haven't left enough space between line numbers then you may use the edit menu to renumber a program. To do this, press the EDIT key then select the Renumber option from the menu that appears; this sets the gap between each line number to 10. Try this out and see how the line numbers change.
REM, NEW, INPUT and GO TO
The command NEW erases any old programs and variables in the computer and starts the machine anew. Try it now; type:
NEW
and press ENTER. You'll see the Welcome Screen and then the Startup menu. With the menu on screen, select again the NextBASIC option.
Carefully type in this program, which changes Fahrenheit temperatures to Celsius:
10 REM Temperature Conversion
20 PRINT "deg F","deg C"
30 PRINT
40 @inpF:INPUT "Enter deg F",
   F
50 PRINT F, (F-32)*5/9
60 GO TO @inpF
Now run it. You will see the headings printed on the screen by line 20, but what happened to line 10? Apparently the computer has completely ignored it changing its colour to red. Indeed, REM in line 10 stands for REMark and is there solely to remind you of what the program does. A REM command consists of REM or the semicolon symbol ( ; ) followed by anything you like, and the computer will ignore it right up to the end of the line.
REM is not really part of a NextBASIC program, it just adds remarks to it for improved readability and documentation and gets totally ignored by NextBASIC. For example:
10 REM this is a remark
20 ; This is also a remark
are functionally equivalent, as are:
10 PRINT 10:REM Remark
20 PRINT 20:; Remark
Note that the colon (:) cannot be ommited, like:
10 PRINT 10;Remark
as then Remark forms part of the PRINT statement. A colon must ALWAYS be used to separate statements on the same line.
Using STOP, BREAK and CONTINUE
By now, the computer has got to the INPUT command on line 40 and is waiting for you to type in a value for the variable F – you can tell this because at the bottom of the screen is a flashing cursor. Enter a number; remember to press ENTER afterwards! Now the computer has displayed the result and is waiting for another number. This is because of line 60, GO TO @inpF, which means exactly what it says. Instead of running out of program and stopping, the computer jumps back to line 40 where the label @inpF is located and starts again. So, enter another temperature. After a few more of these you might be wondering if the machine will ever get bored with this, it won't. Next time it asks for another number, enter the word stop. The computer will stay in the line and the cursor will change shape indicating a non acceptable entry. You have there the choice of hitting BREAK in which case you receive a report H STOP in INPUT, 40:2, which tells you why it stopped, and where (in the second statement of line 40, first being the label @inpF).
If you want to continue the program type:
CONTINUE
and the computer will continue with the INPUT line.
There's a synonym of CONTINUE which is really there for convenience and it's CONT. Try it in lieu of CONTINUE above; it will work in the same way.
Replace line 60 by GO TO 21 – it will make no perceptible difference to the running of the program. If the line number in a GO TO command refers to a non-existing line, then the jump is to the next line after the given number.
This, however, is NOT the case when using GO TO to jump to a label as the latter MUST exist otherwise an error will be produced. The same allowance for line numbers is true as well for RUN; in fact RUN on its own actually means RUN 0.
Now type in numbers until the screen starts getting full. When it is full, the computer will move the whole of the top half of the screen up one line to make room, losing the heading off the top. This is called scrolling.
When you are tired of this, stop the program as shown above and get the listing by pressing ENTER.
Look at the PRINT statement on line 50. The punctuation or print modifier in this – the comma ( , ) is very important, and you should remember that it follows much more definite rules than the punctuation in English. PRINT accepts 3 print modifiers: Commas ( , ), Semicolons ( ; ) and Apostrophes ( ' ).
Commas are used to make the printing start either at the left hand margin, or in the middle of the screen, depending on which comes next. Thus in line 50, the comma causes the Celsius temperature to be printed in the middle of the line. With a semicolon ( ; ) on the other hand, the next number or string is printed immediately after the preceding one. You can see this in line 50, if the comma is replaced by a semicolon. Note here that this is the exact reason why we need to enter a colon before the semicolon if we need to use it as a REMark as discussed in the previous section!
Another punctuation mark you can use like this in PRINT commands is the apostrophe ( ' ). This makes whatever is printed next appear at the beginning of the next line on the screen but this happens anyway at the end of each PRINT command, so you will not need the apostrophe very much. This is why the PRINT command in line 50 always starts its printing on a new line, and it is also why the PRINT command in line 30 produces a blank line.
If you want to inhibit this, so that after one PRINT command the next one carries on on the same line, you can put a comma or semicolon at the end of the first. To see how this works, replace line 50 in turn by each of:
50 PRINT F,
50 PRINT F;
and:
50 PRINT F
and run each version – for good measure you could also try:
50 PRINT F'
The one with the comma spreads everything out in two columns, that with the semicolon crams everything together, that without either allows a line for each number and so does that with the apostrophe – the apostrophe gives a new line of its own, but inhibits the automatic one.
Remember the difference between commas and semicolons in PRINT commands; also, do not confuse them with the colons (:) that are used to separate commands in a single line. Now type in these extra lines:
100 REM this polite program
    remembers your name
110 INPUT n$
120 PRINT "Hello ";n$;"!"
130 GO TO 110
This is a separate program from the last one, but you can keep them both in the computer at the same time. To run the new one, type:
RUN 100
Because this program inputs a string instead of a number, it prints out two string quotes – this is a reminder to you, and it usually saves you some typing as well. Try it once with any alias you care to make up for yourself.
Next time round, you will get two string quotes again, but you don't have to use them if you don't want to. Try this, for example. Rub them out (with ⇨ and DELETE twice), and type:
n$
Since there are no string quotes, the computer knows that it has to do some calculation: the calculation in this case is to find the value of the string variable called n$, which is whatever name you happen to have typed in last time round. Of course, the INPUT statement acts like LET n$=n$, so the value of n$ is unchanged.
The next time round, for comparison, type:
n$
again, this time without rubbing out the string quotes. Now, just to confuse you, the variable n$ has the value "n$".
Generally speaking the INPUT parser3 is very intelligent; with the exception of the example above, there is no way to insert an invalid or improperly formed entry during INPUT. For example moving the cursor back to the beginning of the line, using ⇦ and deleting the first set of quotes and pressing ENTER will produce the now familiar bleep sound and the program cursor will continue blinking until you correct the error by adding the first set of quotes again.
Now look back at that RUN 100 we had earlier on. That just jumps to line 100, so couldn't we have said GO TO 100 instead? In this case, it so happens that the answer is yes; but there is a difference. RUN 100 first of all clears all the variables and the screen, and after that works just like GO TO 100.
GO TO 100 doesn't clear anything. There may well be occasions where you want to run a program without clearing any variables; here GO TO would be necessary and RUN could be disastrous, so it is better not to get into the habit of automatically typing RUN to run a program.
Another difference is that you can type RUN without a line number, and it starts off at the first line in the program. GO TO must always have a line number or label.
Sometimes – by mistake – you write a program that you can't stop and won't stop itself. Type:
200 GO TO 200
RUN 200
This looks all set to go on for ever unless you pull the plug out; but there is a less drastic remedy. Press the BREAK key. The program will stop, saying L BREAK into program.
At the end of every statement, the program looks to see if these keys are pressed; and if they are, then it stops. The BREAK key can also be used when you are in the middle of using the cassette recorder or the printer, or various other bits of machinery that you can attach to the computer – just in case the computer is waiting for them to do something but they're not doing it. In these cases there is a different report, D BREAK - CONT repeats. CONTINUE, in this case (and in fact in most other cases too), repeats the statement where the program was stopped; but after the reports L BREAK into program or 9 STOP Statement, CONTINUE carries straight on with the next statement after allowing for any jumps to be made.
Run the name program again and when it asks you for input type:
n$ (after removing the quotes)
n$ is as of this moment an undefined variable and the computer will bleep as it doesn't recognise your inputted value as proper one. Use BREAK to get out of the program and then type:
3 Parser is a computer program that reads data – usually in the foirm of a string of characters – analyses it and makes sure it conforms into a rigid syntax and/or set of rules in order to become meaningful to the computer
n$="something definite"
(which has its own report of 0 OK, 0:1) and:
CONTINUE
you will find that you can use n$ as input data without any trouble.
In this case CONTINUE does a jump to the INPUT command in line 110. It disregards the report from the LET (implied in this case) statement because that said OK, and jumps to the command referred to in the previous report, the first command in line 110. This is intended to be useful. If a program stops over some error then you can do all sorts of things to fix it, and CONTINUE will still work afterwards.
As we said before, the report L BREAK into program is special because after it, CONTINUE does not repeat the command where the program stopped.
We've seen so far programs where execution jumps to the beginning with no graceful way of ending the program. What we're producing are called never-ending loops and are some of the great pitfalls a programmer can fall in. There are some cases where execution cannot be stopped (if for example we have disabled error reporting) or the BREAK key is inhibited. In these cases we have to provide with either a clear exit path to the program, or use a special keyword that ends a program prematurely and that keyword is STOP. Let's modify our polite program to be as follows:
100 REM this polite program
    remembers your name
110 INPUT n$
120 PRINT "Hello ";n$;"!"
130 STOP
and then give RUN. After we enter our name and the computer greets us, we'll get a 9 STOP statement, 130:1 report indicating we exited the program forcibly by the STOP command on line 130. We could have left line 130 out entirely and the program would have terminated with a 0 OK, 120:1 which would have indicated a proper program termination.
In general, it's a good idea to provide exit paths in situations where the program may end up in a never-ending loop; NextBASIC provides us with such facilities as we're going to see further on.
Error trapping
As we saw above, NextBASIC can occasionally generate error reports whether we have inadvertently caused them ourselves or because something went wrong. Sometimes we need our program to stop execution and other times we want it to recover from the error and continue (as it is the case above where we gave the CONTINUE command). For these cases, NextBASIC provides us with the ON ERROR command.
This can intercept (trap) any error report (except 0 OK which is not considered an error) thus allowing your programs to recover from expected error conditions.
Turning on error trapping is as simple as:
ON ERROR statementlist
This will cause the statements contained in statementlist after the ON ERROR command to be executed whenever an error report would normally have been displayed. Note that this command must be part of a program and cannot be entered as a direct command.
To turn off error-trapping again, just use ON ERROR on its own.
This is required if you wish to generate errors again (and you may wish to do so if you need to know what went wrong). The following example will display There was an error! and terminate with the 9 STOP statement error when line 20 is executed:
10 ON ERROR PRINT "There was
   an error!":ON ERROR:STOP
20 PRINT 5/0
ERROR [n]
To generate the last error that actually occurred (this does not need error-trapping to be turned off), just type the command:
ERROR
followed by ENTER. Assuming the program above, the following amendment will print the message but still give the correct Number too big report:
10 ON ERROR PRINT "There was
   an error!":ERROR
20 PRINT 5/0
Used with the optional parameter n, where n is a value between 0 and 3, ERROR can return the error code (for n=0), the line (for n=1), the statement (for n=2) and the memory bank where it occured (for n=3) – See Chapter 23 for details about memory banks. For example:
PRINT ERROR (1)
given after the example above would return 20. Moreover there's also:
ERROR$
which prints the error report rather than just the code. You could modify the example above to be:
10 ON ERROR PRINT "There was
   error! "; ERROR$:ON
   ERROR:STOP
20 PRINT 5/0
which will print the actual error report Number too big. You could then substitute STOP with a GO TO to the line of error handling code without having to halt execution of your program.
An additional way with which you can obtain details of the last error and store them away maybe for purposes of statistical analysis is using the following command:
ERROR TO codevar [, linevar, [statementvar, [bankvar]]]
This will store the error code in the numeric variable codevar, the line number in linevar, the statement number in statementvar and the bank number in bankvar (do not worry about what bank means for the moment). Note that you do not need to supply later variable names if you do not need the information, so all of these are valid:
ERROR TO e
ERROR TO e,l
ERROR TO e,l,s
ERROR TO e,l,s,b
For example, to get and store the error number into variable e and then print it but still stop execution, we could modify the first program as follows:
10 ON ERROR PRINT "There was
   an error!": ERROR TO e:
   PRINT e: ON ERROR:STOP
20 PRINT 5/0
If we allow the program to finish and then use ERROR we would have gotten the 9 STOP statement, 10:5 error report which would be the last error report in statement 5 of line 10 as STOP is considered an error. But by using ERROR TO, we'll get 6 printed on screen which is the error code for the Number too big error
So far we have seen the keywords PRINT, LET, INPUT, RUN, LIST, GO TO, CONTINUE, STOP, ON ERROR, ERROR, ERROR$, ERROR TO, NEW and REM. Apart from ON ERROR you can also enter them as direct commands – this is true of almost all commands in NextBASIC. RUN, LIST, CONTINUE and NEW are not usually of much use in a program, but they can be used regardless.
Exercises
-
Put a LIST statement in a program, so that when you run it, it lists itself.
-
Write a program to input prices and print out the tax due (at 20 per cent). Put in PRINT statements so that the computer announces what it is going to do, and asks for the input price with extravagant politeness. Modify the program so that you can also input the tax rate (to allow for zero ratings or future changes).
-
Write a program to print a running total of numbers you input. (Suggestion: have two variables called total – set to 0 to begin with – and item. Input item, add it to total, print them both, and go round again.)
-
What would CONTINUE and NEW do in a program? Can you think of any uses at all for this?
ZX Spectrum Next User Manual, 3rd Edition (ISBN 978-1-5272-5496-1), written and illustrated by Phoebus R. Dokos. Copyright © 2020-2024 Phoebus Dokos / SpecNext Ltd. Licensed under CC BY-NC-SA 4.0. This is a transcription and can contain errors; check any doubt against the printed page.