Pages 74–80 · Markdown
Chapter 13 – The Character Set
The letters, digits, punctuation marks and so on that can appear in strings are called characters, and they make up the alphabet, or character set that the ZX Spectrum Next uses.
CHR$ and CODE
As you will also see in Appendix A, there are 256 character locations, and each one is assigned a code between 0 and 255. To convert between codes and characters, two functions exist: CODE and CHR$. CODE is applied to a string, and returns the code of the first character in the string (or 0 if the string is empty). CHR$ is applied to a code, and returns the single character string that corresponds to that code. We started this paragraph by saying "character locations" and not simply "characters. As we will find out further below and in Chapters 14, 20 and Appendix A, some characters are non-printable and as a matter-of-fact perform special functions. The following little program prints out the entire usable character set:
10 FOR a=32 TO 255: PRINT CHR$ a;: NEXT a
At the top you can see a space, 15 symbols and punctuation marks, the ten digits, seven more symbols, the capital letters, six more symbols, the lower case letters and five more symbols. These are all (except £ and ©) taken from a widely-used set of characters known as ASCII (standing for American Standard Codes for Information Interchange); ASCII also assigns numeric codes to these characters, and these are the codes that the ZX Spectrum Next uses.
The graphics symbols
The rest of the characters are not part of ASCII, and are specific to the ZX Spectrum Next. First amongst them are a space and 15 patterns of black and white blobs. These are called the graphics symbols and can be used for drawing rudimentary pictures. You can enter these from the keyboard, using what is called graphics mode.
If you press GRAPHICS then the cursor will change to a flashing white/magenta. Now the keys for the digits 1 to 8 will give the graphics symbols: on their own they give the symbols drawn on the keys; and with either shift pressed they give the same symbol but inverted, i.e. black becomes white, and vice versa. Regardless of shifts, digit 9 takes you back to normal mode (blue cursor) and digit 0 is DELETE. Here are the sixteen graphics symbols:
| Symbol | Code | Key | Symbol | Code | Key |
|---|---|---|---|---|---|
| 128 | 8 | █ | 143 | Shift+8 | |
| ▝ | 129 | 1 | ▙ | 142 | Shift+1 |
| ▘ | 130 | 2 | ▟ | 141 | Shift+2 |
| ▀ | 131 | 3 | ▄ | 140 | Shift+3 |
| ▗ | 132 | 4 | ▛ | 139 | Shift+4 |
| ▐ | 133 | 5 | ▌ | 138 | Shift+5 |
| ▚ | 134 | 6 | ▞ | 137 | Shift+6 |
| ▜ | 135 | 7 | ▖ | 136 | Shift+7 |
Table 5 – Graphics Symbols
Tokens
When not used as single symbols, several character codes are used in an alternative manner, where they are called tokens, Tokens represent whole words, such as PRINT, STOP, >=, <>, <= and so on. This is to save space in the machine's main RAM, thus maximising the available program space by substituting multiple character words for single character codes.
BIN and USR
After the graphics symbols, you will see what appears to be another copy of the alphabet from A to U. These are characters that you can redefine yourself, although when the machine is first switched on they are set as letters – they are called user-defined graphics (or UDGs for short). You can type these in from the keyboard by going into graphics mode, and then using the letters keys from A to U.
To define a new character for yourself, follow this recipe – it defines a character to show the mathematical symbol Σ (Greek for Συνολο=sum).
i. Work out what the character looks like. Each character has an 8x8 square of dots, each of which can show either the paper colour or the ink colour (see Chapter 15 regarding INK and PAPER). You'd draw a diagram something like this, with black squares for the ink colour:
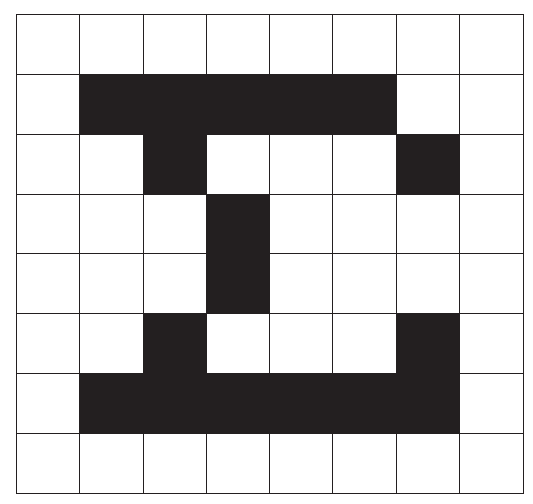
We've left a 1 square margin round the edge because the other letters all have one (except for lower case letters with tails, where the tail goes right down to the bottom of the square).
ii. Work out which user-defined graphic is to show - let's say the one corresponding to S, so that if you press S in graphics mode you get Σ on your screen.
iii. Store the new pattern. Each user-defined graphic has its pattern stored as eight numbers, one for each row. You can write each of these numbers as BIN followed by eight 0s or 1s – 0 for paper, 1 for ink – so that the eight numbers for our character are:
BIN 00000000
BIN 01111100
BIN 00100010
BIN 00010000
BIN 00010000
BIN 00100010
BIN 01111110
BIN 00000000
(If you know about binary numbers, then it should help you to know that BIN is used to write a number in binary instead of the usual decimal.)
These eight numbers are stored in memory, in eight places, each of which has an address. The address of the first byte, or group of eight digits, is USR "S" (S because that is what we chose in (ii)), that of the second is USR "S"+1, and so on up to the eighth, which has address USR "S"+7.
USR here is a function to convert a string argument into the address of the first byte in memory for the corresponding user-defined graphic. The string argument must be a single character which can be either the user-defined graphic itself or the corresponding letter (in upper or lower case). There is another use for USR, when its argument is a number, which will be dealt with in subsequent chapters.
Even if you don't understand this, the following program will do it for you:
 5 FOR n=0 TO 7
10 READ row: POKE USR
   "S"+n,row
15 NEXT n
20 DATA BIN 00000000
25 DATA BIN 01111100
30 DATA BIN 00100010
35 DATA BIN 00010000
40 DATA BIN 00010000
45 DATA BIN 00100010
50 DATA BIN 01111110
60 DATA BIN 00000000
The above example can also be rewritten using integer variables without the use of BIN while still expressing the graphic matrix in binary form. Can you restate it per what you've learned?
POKE and PEEK
The POKE statement stores a number directly in a memory location, bypassing the assignment (LET) mechanism normally used by NextBASIC which also tracks its place in memory. The opposite of POKE is PEEK, and this allows us to look at the contents of a memory location although it does not actually alter the contents of that location. They will be dealt with properly in Chapter 23.There are a few more efficient ways to type all the above but for now, we're using the simplest forms of PEEK and POKE.
The tokens (which we referred to a little earlier) are stored right after character code 128. As you saw, in the character set printing example, codes 0 to 31 were absent. These are control characters or as commonly referred to: control codes. They either don't produce characters on screen – although they do have an effect on what's printed there – or, alternatively, they are used to control something other than the display itself, and the screen displays ? to show that it doesn't understand them. They are described more fully in Appendix A.
Three control codes that are used with screen output, are those with codes 6, 8 and 13:
CHR$ 6 prints spaces in exactly the same way as a comma does in a PRINT statement; for instance:
PRINT 1; CHR$ 6;2
does the same as:
PRINT 1,2
Obviously this is not a very clear way of using it. A more subtle way is to say:
a$="1"+CHR$ 6+"2"
PRINT a$
CHR$ 8 is backspace: it moves the print position back one place – try:
PRINT "1234";CHR$ 8;"5"
which prints up:
1235
as 5 takes the place of 4 from the string printed in the first part of the PRINT statement.
CHR$ 13 is carriage return: it moves the print position on to the beginning of the next line.
Effectively:
PRINT "1234";CHR$ 13;"5678"
is the same as:
PRINT "1234":PRINT "5678"
It may not be immediately apparent why you wouldn't do the latter but it's possible also to do:
a$="1234"+CHR$ 13+ "5678"
PRINT a$
In which case you can see the usefulness of a single carriage return character.
The screen also uses control codes 16 to 23; these are explained in Chapters 13 and 14. All the control codes are listed in Appendix A.
Using the codes for the characters we can extend the concept of alphabetical ordering to cover strings containing any characters, not just letters. If instead of thinking in terms of the usual alphabet of 26 letters we use the extended alphabet of 256 characters, in the same order as their codes, then the principle is exactly the same. For instance, these strings are in their ZX Spectrum Next alphabetical order: (Notice the rather odd feature that lower case letters come after all the capitals: so a comes after Z; also, spaces matter.)
CHR$ 3+"ZOOLOGICAL GARDENS"
CHR$ 8+"AARDVARK HUNTING"
"   AAAARGH!"
"(Parenthetical remark)"
"100"
"129.95 inc. VAT"
"AASVOGEL"
"Aardvark"
"PRINT"
"Zoo"
"[interpolation]"
"aardvark"
"aasvogel"
"zoo"
"zoology"
Here is the rule for finding out which order two strings come in. First, compare the first characters. If they are different, then one of them has its code less than the other, and the string it came from is the earlier (lesser) of the two strings. If they are the same, then go on to compare the next characters. If in this process one of the strings runs out before the other, then that string is the earlier, otherwise they must be equal.
The relations =, <, >, <=, >= and <> are used for strings as well as for numbers: < means comes before and > means comes after, so that:
"AA man"<"AARDVARK"
"AARDVARK">"AA man"
are both true.
<= and >= work the same way as they do for numbers, so that:
"The same string"<="The same string"
is true, but:
"The same string"<"The same string"
is false.
Experiment on all this using the program here, which inputs two strings and puts them in order.
10 INPUT "Type in two
   strings:", a$, b$
20 IF a$>b$ THEN a$,b$=b$,a$
30 PRINT a$;" ";
40 IF a$<b$ THEN PRINT "<";:
   GO TO 60
50 PRINT "=";
60 PRINT " ";b$
70 GO TO 10
Note how we are using a multiple assignment in order to swap a$ and b$ in line 20 as
a$=b$:b$=a$
would not have the desired effect since a$ would have the value of b$ prior to trying to assign its value to b$.
This program sets up user-defined graphics to show chess pieces:
P for pawn
R for rook
N for knight
B for bishop
K for king
Q for queen
Chess pieces
  5 b,c,d=BIN 01111100,BIN
    00111000,BIN 00010000
 10 FOR n=1 TO 6: READ p$: REM
    6 pieces
 20 FOR f=0 TO 7: REM read
    piece into 8 bytes
 30 READ a: POKE USR p$+f,a
 40 NEXT f
 50 NEXT n
100 REM bishop
110 DATA "b",0,d, BIN
    00101000,BIN 01000100
120 DATA BIN 01101100,c,b,0
130 REM king
140 DATA "k",0,d,c,d
150 DATA c, BIN 01000100,c,0
160 REM rook
170 DATA "r",0, BIN
    01010100,b,c
180 DATA c,b,b,0
190 REM queen
200 DATA "q",0, BIN 01010100,
    BIN 00101000,d
210 DATA BIN 01101100,b,b,0
220 REM pawn
230 DATA "p",0,0,d,c
240 DATA c,d,b,0
250 REM knight
260 DATA "n",0,d,c, BIN
    01111000
270 DATA BIN 00011000,c,b,0
Note that 0 can be used instead of BIN 00000000.
When you have run the program, look at the pieces by going into graphics mode.
Alternative Character Sets
As we are going to see in Chapter 20 – Channels, Streams and Windows the ZX Spectrum Next provides via its windowing system, the ability to display alternative character sets. In order to set up however an alternative character set, characters have to be defined somewhere in memory, very similarly to the way we did the chess pieces or the Σ symbol above. The characters redefined are limited to the 96 from code 32 until code 127 and should be in that order. A successive series of 768 POKE statements incrementing the memory address by one location at the time, will define them and then a last POKE altering the
CHARS system variable (See Chapter 24 – System Variables) will point NextBASIC to the location of this new character set.
Character Graphics Mode
In the following chapter, we will be introduced to Layer 3 – the Character Graphics mode; this is a hybrid graphics mode based around the notion of a character tile, that is to say an 8 × 8 pixel matrix very much like the ones we explored above with User Defined Graphics with four very crucial differences:
- Each character tile can have up to sixteen colours and not only two.
- All ASCII characters can be defined by tiles giving the user in effect a truly multi-lingual character display.
- Layer 3 displays can be either 80 columns by 32 rows or 40 columns by 32 rows and not only 32 columns by 24 rows as the regular Spectrum display is.
- Layer 3 cannot be accessed from NextBASIC (at the time of writing) in the same, straightforward way, other modes/layers are. You will need to write functions and procedures that utilise the PEEK, POKE, IN, OUT and REG facilities as well as the BANK commands at your disposal in order to make use of this powerful mode.
Layer 3 has other uses as well and we will be discussing those in the following 3 chapters.
Exercises
-
Imagine the space for one symbol divided up into four quarters like a Battenburg cake. Then if each quarter can be either black or white, there are 2 x 2 x 2 x 2=16 possibilities. Find them all in the character set.
-
Run this program:
10 INPUT a
20 PRINT CHR$ a;
30 GO TO 10
If you experiment with it, you'll find that CHR$ a is rounded to the nearest whole number; and if a is not in the range 0 to 255 then the program stops with error report:
B integer out of range.
-
Which of these two is the lesser?
"EVIL"
"evil"
ZX Spectrum Next User Manual, 3rd Edition (ISBN 978-1-5272-5496-1), written and illustrated by Phoebus R. Dokos. Copyright © 2020-2024 Phoebus Dokos / SpecNext Ltd. Licensed under CC BY-NC-SA 4.0. This is a transcription and can contain errors; check any doubt against the printed page.