Pages 144–156 · Markdown
Chapter 18 – Sound and Music
Unlike its predecessors, your ZX Spectrum Next doesn't fare poorly in the audio capabilities department. From simple beeps and clicks, to complex compositions using its in-built 3 Programmable Sound Generators (PSGs) and full-fledged digital audio output, sound can accompany almost every program you write or software you will load. Sound is output in stereo from both the digital video port and an analogue 3.5mm jack output present on the back of the machine. Additionally, there is the possibility of an on-board piezo speaker (sold separately).
Basic sounds with the BEEP command
The easiest way to create sounds (and the only method that works on all ZX BASIC versions including NextBASIC) is by using the BEEP statement:
BEEP duration, pitch
where, as usual, duration and pitch represent any numerical expressions. The duration is given in seconds, and the pitch is given in semitones above middle C. For notes below middle C we use negative numbers.
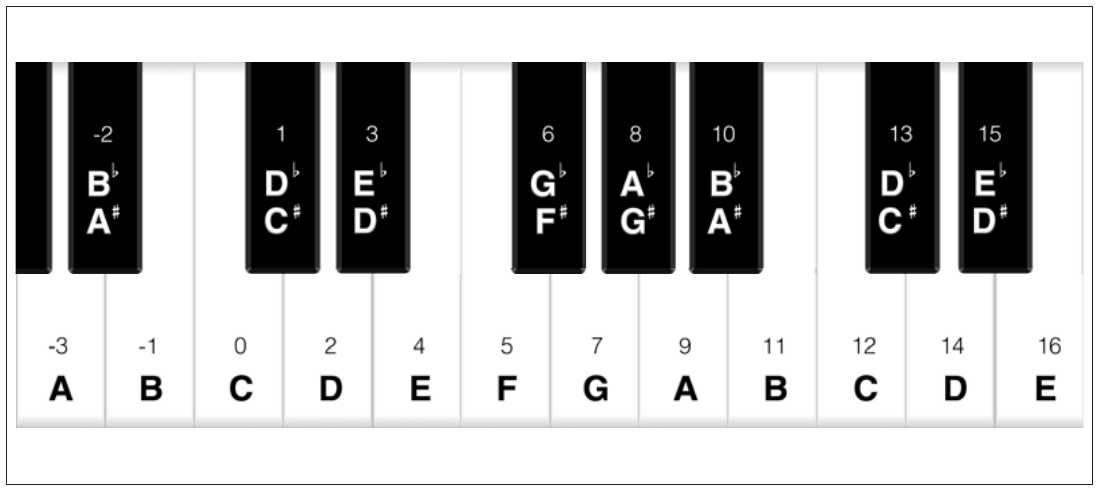
Here is a diagram to show the pitch values of all the notes in one octave on the piano:
   -2    1    3         6    8   10        13   15
   B♭   D♭   E♭        G♭   A♭   B♭        D♭   E♭
   A♯   C♯   D♯        F♯   G♯   A♯        C♯   D♯

 -3   -1    0    2    4    5    7    9   11   12   14   16
  A    B    C    D    E    F    G    A    B    C    D    E
Fig. 17 – Pitch/note equivalents
To get higher or lower notes, you have to add or subtract 12 for each octave that you go up or down.
If you have a piano in front of you when you are programming a tune, this diagram will probably be all that you need to work out the pitch values. If, however, you are transcribing straight from some written music, then we suggest that you draw a diagram of the stave with the pitch value written against each line and space, taking the key into account.
For example, type:
10 PRINT "Frere Gustav"
20 BEEP 1,0: BEEP 1,2: BEEP .5,3: BEEP
   .5,2: BEEP 1,0
30 BEEP 1,0: BEEP 1,2: BEEP .5,3: BEEP
   .5,2: BEEP 1,0
40 BEEP 1,3: BEEP 1,5: BEEP 2,7
50 BEEP 1,3: BEEP 1,5: BEEP 2,7
60 BEEP .75,7: BEEP .25,8: BEEP .5,7:
   BEEP .5,5: BEEP .5,3: BEEP .5,2: BEEP
   1,0
70 BEEP .75,7: BEEP .25,8: BEEP .5,7:
   BEEP .5,5: BEEP .5,3: BEEP .5,2:
   BEEP 1,0
80 BEEP 1,0: BEEP 1,-5: BEEP 2,0
90 BEEP 1,0: BEEP 1,-5: BEEP 2,0
When you run this, you should get the funeral march from Mahler's first symphony, the bit where the goblins bury the US Cavalry man.
Suppose for example that your tune is written in the key of C minor, like the Mahler above. The beginning looks like this:

and you can write in the pitch values of the notes like this:

0 2 3 2 0 0 2 3 2 0 3 5 7 3 5 7
We have put in two ledger lines, just for good measure. Note how the E flat in the key signature affects not only the E in the top space, flattening it from 16 to 15, but also the E on the bottom line, flattening it from 4 to 3. It should now be quite easy to find the pitch value of any note on the stave.
If you want to change the key of the piece, the best thing is to set up a variable key and insert key+ before each pitch value: thus the second line becomes:
20 BEEP 1,key+0: BEEP 1,key+2: BEEP .5,
   key+3: BEEP.5,key+2: BEEP 1,key+0
Before you run a program you must give key the appropriate value – 0 for C, 2 for D, 12 for C an octave up, and so on. You can get the computer in tune with another instrument by adjusting key, using fractional values.
You also have to work out the durations of all the notes. Since this is a fairly slow piece, we have allowed one second for a crotchet and based the rest on that, half a second for a quaver and so on.
More flexible is to set up a variable crotchet to store the length of a crotchet and specify the durations in terms of this. Then line 20 would become:
20 BEEP crotchet,key+0: BEEP crotchet,
   key+2: BEEP crotchet/2,key+3: BEEP
   crotchet/2,key+2: BEEP crotchet, key+0
(You will probably want to give crotchet and key shorter names.)
By giving crotchet appropriate values, you can easily vary the speed of the piece.
When using BEEP, one must remember that via NextBASIC we can only produce one tone per unit of time since this is done via the CPU, therefore you are restricted to unharmonised tunes. If you want harmonies, you should either use the PLAY command described in the following section or program the computer in Machine Code. Further-
more, since tone generation via the CPU is an exclusive task, you cannot do anything else on or off screen while the sound is playing, so in order to perform other functions while sound is generated by using the CPU, you will also have to program in Machine Code, or –assuming you have the Accelerated version or a Pi Zero installed– use the audio playback facilities described in the last section of this chapter (the latter working independently of whatever the ZX Spectrum Next is doing).
Try programming tunes in for yourself – start off with fairly simple ones like Three Blind Mice. If you have neither piano nor written music, find a very simple instrument like a tin whistle or a recorder, and work the tunes out on that. You could make a chart showing the pitch value for each note that you can play on this instrument.
Type:
FOR n=0 TO 1000: BEEP .5,n:
NEXT n
This will play notes as high as it can, and then stop with error report B Integer out of range. You can print out n to find out how high it did actually get.
Try the same thing, but going down into the low notes. The very lowest notes will just sound like clicks; in fact the higher notes are also made of clicks in the same way, but faster, so that the human ear cannot distinguish them.
Only the middle range of notes are really any good for music; the low notes sound too much like clicks, and the high notes are thin and tend to warble a bit.
Type in this program line:
10 BEEP .5,0: BEEP .5,2: BEEP .5,4:
   BEEP .5,5: BEEP .5,7: BEEP .5,9:
   BEEP .5,11: BEEP .5,12: STOP
This plays the scale of C major, which uses all the white notes on the piano from middle C to the next C up. The way this scale is tuned, is exactly the same as on a piano, the so-called even-tempered tuning because the pitch interval of a semitone is the same all the way up the scale. A violinist, however, would play the scale very slightly differently, adjusting all the notes to make them sound more pleasing to the ear. He can do this just by moving his fingers very slightly up or down the string in a way that a pianist can't.
The natural scale, which is what a violinist would play, comes out like this:
20 BEEP .5,0: BEEP .5,2.039: BEEP .5,
   3.86: BEEP .5,4.98: BEEP .5,7.02:
   BEEP .5,8.84: BEEP .5,10.88:
   BEEP .5,12: STOP
You may or may not be able to detect any difference between these two; some people can. The first noticeable difference is that the third note is slightly flatter in the naturally tempered scale. If you are a real perfectionist, you might like to program your tunes to use this natural scale instead of the even-tempered one. The disadvantage is that although it works perfectly in the key of C, in other keys it works less well – they all have their own natural scales – and in some keys it works very badly indeed. The even-tempered scale is only slightly off, and works equally well in all keys.
This is less of a problem on the computer, of course, because you can use the trick of adding on a variable key.
Some music – notably Indian music – uses intervals of pitch smaller than a semitone. You can program these into the BEEP statement without any trouble; for instance the quartertone above middle C has a pitch value of .5.
You can make the keyboard beep instead of clicking by:
POKE 23609,255
The second number in this determines the length of the beep (try various values between 0 and 255). When it is 0, the beep is so short that it sounds like a soft click.
Enhanced Sound and Music with PLAY
When using NextBASIC, you have two different ways to make music and sound effects. You can still use the BEEP command (as discussed above) but you also have access to the PLAY command which allows you to make much more sophisticated music with up to nine notes playing at once. It also gives you more control over the sound of each individual note than is possible using BEEP.
Making music and sound effects with PLAY is simple. You just type in the series of notes that make up a tune, then ask the ZX Spectrum Next to PLAY them. You can also include instructions that tell your machine what sort of tone you want for the sound. Please note that case is important when typing in the string expressions in the examples ie. ga should not be typed as Ga, gA or GA.
To hear some of the wide range of sounds that you can make, type in one of the two programs below, RUN it, then try the other example. Don't worry if the program lines look complicated, they are explained in detail later.
Music:
10 b$="O4(CDEC)(5EF7G)(3GAGF5EC)
   5Eb7E9EbE"
20 PLAY "T180O6(CDEC)(5EF7G)(3GAGF5EC)
   5Cg7C9CgC",b$,"O3(7CG)(7CG)(7CG)
   5GD7G9GDG"
Sound Effects:
10 a$="M8UX350W5O7(((C)))": PLAY a$ :
   PAUSE 25
20 PLAY "M56UX5000W1O3(((C)))": PAUSE 25
30 a$="M56W2O1N8C" : PLAY a$ : PAUSE
   25
Using the PLAY command
In the examples above, you will see that each time the PLAY command appears, it is followed by up to nine different parameters in the form of either string variables, string literals or a combination of both in a statement like:
PLAY P1C1,P1C2,P1C3,P2C1,P2C2,P2C3,P3C1,P3C2,P3C3
where PxCy are strings that refer to the PSG (P) number (x) (1 to 3) and channel (C) number (y) (1 to 3). The order of these is specific and each PLAY command must have the full complement if you require all the channels to reproduce a sound. You cannot issue two or more PLAY commands to control individual PSGs as each PLAY statement sends a batch of instructions to the audio hardware. If you wish one or more channels to be silent you should replace them with the empty string "". As we will examine below, the strings contain all the information to tell your ZX Spectrum Next which sounds to make.
As we discussed, PLAY controls nine separate sound channels over the 3 available PSGs, each called A, B, and C.
In the Music example given above, "T180O6(CDEC)(5EF7G)(3GAGF5EC)5Cg7C9CgC" tells channel A of PSG1 to play the melody line, b$ tells channel B of PSG1 to play a harmony, and "O3(7CG)(7CG)(7CG)5GD7G9GDG" tells channel C of PSG1 to play a bass part. In the Sound Effects example, only one noise is used at a time (although up to nine
can be), so each one is in channel A of PSG1 and the command is simply PLAY a$ – or (as seen in line 20) PLAY "M56UX5000W1O3(((C)))".
In fact any of the channels can produce either a musical tone or noise or even nothing at all, so you can mix sound effects in with your music (see Channel selection later on).
Constructing strings
Composing music and sound effects in NextBASIC is just a matter of creating strings containing the information you want. Try this – very simple – example, which plays just one note – an A.
a$="a": PLAY a$
Any music program using PLAY will generally use string variables rather than literals to tell it what to play, as you can see by looking at the earlier examples. The more complex, or longer, the piece and the more complicated sound, the more complex the strings become as obvious from the increased complexity of the examples above.
Any musical sound has a pitch and duration. It also has a volume and timbre. The strings in the earlier examples contain information about all of these. The summary below lists each possible command, and they are explained in detail opposite.
PLAY command summary
This is a brief list of the commands which can be contained in a PLAY string. Note that all letters except note names must always be in capitals.
| String entry | Function |
|---|---|
| c-b or C-B | Gives pitch of note within current octave range |
| $ | Flattens note following it |
| # | Sharpens note following it |
| Ox | Sets octave range x (0 to 8) |
| 1-12 | Sets duration of note |
| & | Denotes a rest |
| N | Separates two numbers |
| Vx | Sets volume to x (0-15) |
| Wx | Sets volume effect to x (0-7) |
| U | Turns on volume effect in the current channel |
| Xx | Sets duration of volume effect to x (0-65535) |
| Tx | Sets tempo to x (60-240) bpm |
| ( ) | Enclose repeated phrase |
| ! ! | Enclose a comment |
| H | Halts a PLAY command |
| Mx | Selects channel and sets type to x (1-63) |
| Yx | Turns on MIDI channel x (1-16) |
| Zx | Sends x as a MIDI patch |
| L | Restricts output from current PSG to Left Speaker Only |
| R | Restricts output from current PSG to Right Speaker Only |
| S | Restores stereo mode to current PSG |
Table 10 – PLAY commands
Setting the pitch
As you saw above, you set the pitch of any note by giving its musical name – eg. C E G. Sharp notes are prefixed by # (eg #C) and flat notes by $. A two-octave range in the key of C, which use the letters c to b for the notes in the lower octave and C to B in capitals for the
higher one are available at any moment. Any number of notes within these two octaves can be played one after another, for example:
10 a$="cfedafgCFEDAFGCC"
20 PLAY a$
If you want to span more than just two octaves, you can change the overall pitch of the channel playing by using the octave command O followed by a number from 0 to 8. If you do not specify an octave (as in the example above), this defaults to 5 (the range containing middle C). The octave command remains in force for all notes following it until a new octave command is given.
This program lets you hear the same tune played in a higher octave (just add the O7 to your earlier program):
10 a$="O7cfedafgCFEDAFGCC"
20 PLAY a$
Try changing the octave number progressively to hear the full pitch range which your ZX Spectrum Next's PSGs can produce.
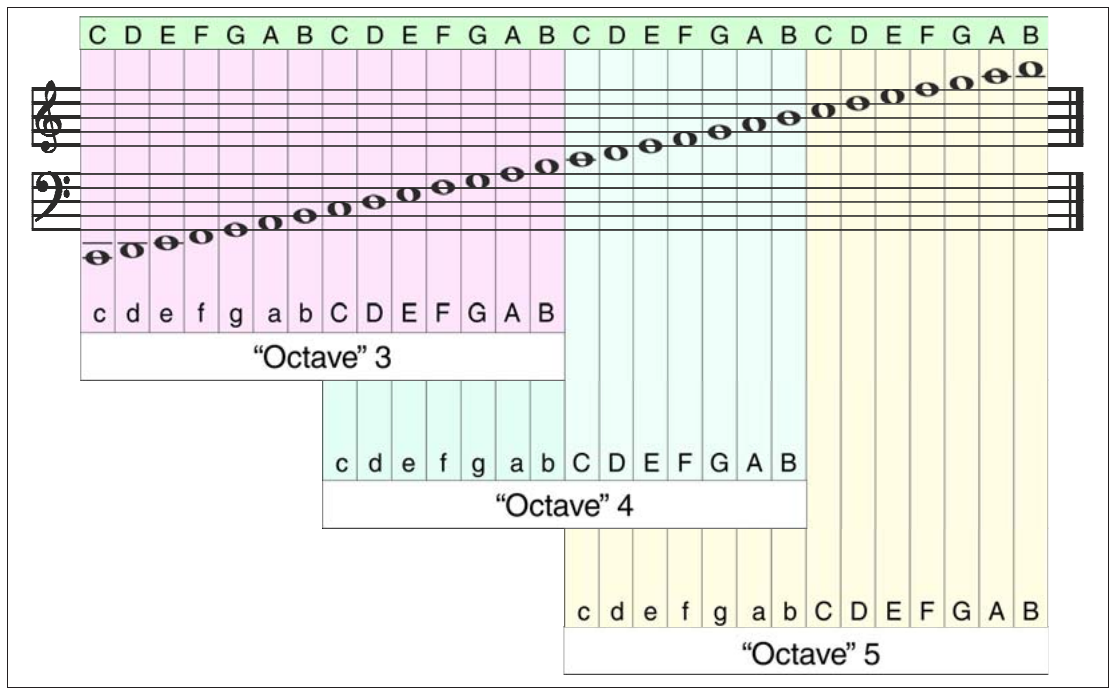
Since each pitch range covers two octaves, two adjacent ranges overlap. For example, the high part of O4 contains the low part of O5 (see Figure below). The following diagram shows how you can create different notes using the PLAY octave command. As mentioned previously, the command O followed by a number from 0 to 7 sets the current PSG to a range of two octaves beginning with a C. The diagram shows the complete range of notes covered by O3, O4, and O5. Adjacent octave ranges overlap, so the same notes appear in the upper part of one range and the lower part of another. Individual notes within an octave range are set by using the letters c to b in lower case for the lower notes and C to B in capitals to give the notes in the upper octave. Placing a # before any note letter gives a sharp note – a $ flattens it.
C D E F G A B C D E F G A B C D E F G A B C D E F G A B
c d e f g a b C D E F G A B
“Octave” 3
              c d e f g a b C D E F G A B
              “Octave” 4
                            c d e f g a b C D E F G A B
                            “Octave” 5
Fig. 18 – Octaves and Pitch values for making music with PLAY
Note duration
If you do not specify the length of each note, they will all be played at the same length (as crotchets) as in the examples above. You can fix the length of any note or series of notes by prefixing it with a number from 1 to 12. This program lets you hear the different note du-
ration with numbers from 1 to 9 (there is a reason for the maximum number being 9 in this example as you will see in the table below).
10 a$="1C2C3C4C5C6C7C8C9C"
20 PLAY a$
The PLAY command supports 9 standard musical durations: from a semiquaver (sixteenth note) to a semibreve (whole note) of the time signature. There are three extra duration values which denote triplet notes (three notes played in the time normally used for two): from a triplet semiquaver (triplet sixteenth) to a triplet crotchet (triplet quarter). While the first 9 values are set and apply to all the notes that follow, a triplet duration value (10-12) only applies to the next 3 notes that will follow it in the string. For example:
10 PLAY "11ACE"
plays a triplet quaver of A, C and E. The following table lists the note duration values and their musical term equivalent.
| Value | Note name (Standard) | Note name (British) | Musical notation |
|---|---|---|---|
| 1 | Sixteenth | Semiquaver | 𝅘𝅥𝅯 |
| 2 | Dotted sixteenth | Dotted semiquaver | 𝅘𝅥𝅯𝅭 |
| 3 | Eighth | Quaver | 𝅘𝅥𝅮 |
| 4 | Dotted eighth | Dotted Quaver | 𝅘𝅥𝅮𝅭 |
| 5 | Quarter | Crochet | 𝅘𝅥 |
| 6 | Dotted Quarter | Dotted Crochet | 𝅘𝅥𝅭 |
| 7 | Half | Minim | 𝅗𝅥 |
| 8 | Dotted Half | Dotted Minim | 𝅗𝅥𝅭 |
| 9 | Whole | Semibreve | 𝅝 |
| colour: pale yellow 10 | colour: pale yellow Triplet sixteenth | colour: pale yellow Triplet semiquaver | colour: pale yellow 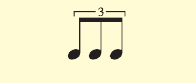 |
| colour: pale yellow 11 | colour: pale yellow Triplet eighth | colour: pale yellow Triplet quaver | colour: pale yellow 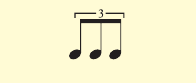 |
| colour: pale yellow 12 | colour: pale yellow Triplet quarter | colour: pale yellow Triplet crotchet | colour: pale yellow 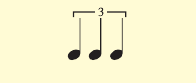 |
Table 11 – Note duration values
Additionally there is also the ability to insert moments of silence (or rests as they're called in music terminology) denoted by the ampersand symbol (&). Rests, last as long as the current note playing. For example:
10 PLAY "7A&B&C&D&E"
is five minims with equal (minim-length) silence durations between them.
Tied notes can be indicated by giving the two note durations connected by an underscore character (_) and the note name, eg.:
10 PLAY "3_5A"
The second note duration you give will also apply to any following codes until you give another duration code.
The N Command
In some of the examples you will see the letter N used to introduce a series of notes within the string:
PLAY "O7N1CDE"
N is used in cases where two sets of numbers would otherwise clash. In the example above, O is set to octave 7, then a series of notes is given, starting with the duration code 1. Without the N code, NextBASIC would read the octave code as 71 – obviously not what was intended!
Note volume
The overall volume of the sound is controlled by the volume setting of your display or amplifier. You can control, however, the volume of individual notes and phrases within the tune by using the V command. V followed by a number from 0 to 15 sets the note(s) that follow to a constant volume level. The lower the number, the quieter the sound, with V0 being completely silent (V0 is a useful way of stopping one channel playing while others continue). V15 is the maximum possible value and will be used automatically by NextBASIC if you do not specify a level.
The low volumes are very quiet and you will normally use 10 to 15 unless you are outputting to an amplification system. Try running this program:
10 a$="V10cdefgabCDEFGAB"
20 PLAY a$
Now try changing the number after the V to a new value to hear the difference.
Volume effects
Instead of you just setting each note to a fixed volume, PLAY also lets you change the volume of the sound while it is playing. For example, you can make a note start suddenly and then die away (like a piano) or make a sound effect rise and fall in volume (like a steam train).
This effect is controlled by the letter W which can be included in any of the strings controlled by the PLAY command. You must also include the letter U in each string where you want to use the effect. You cannot use it if the string already has a volume setting (if it contains a V) – the volume command will override the effect.
The W must be followed by a number from 0 to 7 which controls how the sound builds up (called attack) or falls off (called decay). Table 13 that follows, shows the full range of numbers and what they do together with a visual representation of the volume effect applied to the sound playing:
This program plays the same note with each effect in turn to let you hear what they sound like:
10 a$="UX1000W0C&W1C&W2C&
   W3C&W4C&W5C&W6C&W7C"
20 PLAY a$
Notice the U to turn on the effect, then the series of W numbers.
There is one other new command used here, the letter X. This can be followed by a number from 0 to 65535 to set the length of the sound effect – the larger the number, the longer the effect lasts.
The X command is not mandatory. If you choose not to include one, NextBASIC will automatically choose the longest. In general, repetitive effects (W4 to W7) are more effective
with short settings, eg X300. Single-shot effects (W0 to W3) need a longer period, eg X1000. Try changing the value after X in the program above to hear the difference.
Tempo
The speed (tempo) at which a piece of music is played can be set with the command T followed by the number of crotchet beats per minute (bpm) in the range 60 to 240. The command controls the speed at which all notes are played, but can only be included in channel A of PSG1 (the first string after the PLAY command) otherwise it is ignored, eg:
10  a$="T180cdefg"
20 PLAY a$, "T120CDEFG"
will play octave chords but at 180bpm as the second setting is ignored. If no tempo is specified, the music will be played at 120 bpm.
Repeated phrases
Any musical phrase can be repeated by enclosing the appropriate string or part of a string in parentheses. For example:
10 PLAY "abC(DEFG)"
will repeat the last four notes. If there is an unequal number of parentheses, the phrase will be repeated back to the last parenthesis. If there is only a closing parenthesis, the phrase will be repeated back to the beginning of the string. As an example:
10 PLAY "abCDEFG)"
will repeat all seven notes. Double closing parentheses:
10 PLAY "O2CEGA))"
will cause an infinite repeat. This is particularly useful for things like repetitive bass lines. To turn off an infinite repeat you will need to use the H command.
| Effect Value | Visual Representation | Description |
|---|---|---|
| 0 |  |
Decay then stop |
| 1 |  |
Attack then stop |
| 2 | 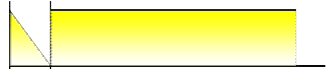 |
Decay then hold |
| 3 | 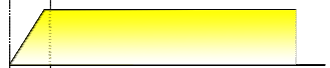 |
Attack then hold |
| 4 | 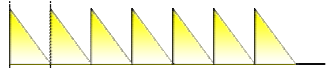 |
Repeated Decay |
| 5 | 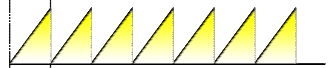 |
Repeated Attack |
| 6 | 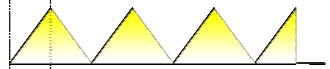 |
Repeated Attack-Decay |
| 7 | 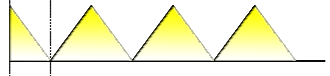 |
Repeated Decay-Attack |
Table 12 – Volume effects values
The H command
An H included in any string immediately turns off the PLAY command. The main use of this is where you have an infinitely repeated bass line in one string. You can stop this at the end of the tune by putting an H on the end of the string which plays the melody.
Comments
You can include reminders and comments anywhere you like by using !! marks. Anything written after a ! will be ignored until the next ! or the " at the end of the string is reached, for example:
10 PLAY "abCDEFG!chorus!aCEaDG"
Channel selection
The command M is used to select which of the three channels are in operation per PSG and whether these give noise or musical tones.
You can have a maximum of nine channels (three per PSG) in use at any one time, but it does not matter whether they are all tone, all noise, or a mixture of both.
Your choice is entered with a number following the M, worked out like this:
| Tone Channels | Noise Channels | |||||
|---|---|---|---|---|---|---|
| Channel | A | B | C | A | B | C |
| Number | 1 | 2 | 4 | 8 | 16 | 32 |
Table 13 – Channel audio type selection codes
Mark each channel you want to turn on, and note down its number from the table above. Then just add them together to get the code you should use after the M. For example, if you want to use tone channels A, B, and C, you add the numbers 1+2 +4 = 7, so you use the command M7. In the same way, M56 would turn on noise channels A, B, and C.
Noise can be used on any channel but the most wide-ranging frequencies are available in channel A for each PSG. For the best results, put your sound effects in the string which controls this channel for each PSG – 1st, 4th and 7th string, in other words the first string per PSG after the PLAY command.
Stereo control
The PLAY commands L, R and S control the stereo image for each PSG. The first two restrict the current PSG's audio output to Left and Right speakers respectively while the latter resets the Stereo image. If your ZX Spectrum Next is set up with ABC stereo (the default), normally channel A goes to the left speaker, B goes to left and right, and C goes to right.
Therefore, if the L command is used, only channels A and B from the current PSG will be audible. Similarly, if R is used, only channels B and C will be audible. Like the M command, the L, R and S commands need to be re-entered in the strings targeting each PSG.
Digital Audio
Your ZX Spectrum Next also contains hardware that can output digital audio, that is sound previously recorded digitally for reproduction, in a similar manner to your house or car CD and MP3 players. There is no easy way to manipulate this hardware from NextBASIC so NextZXOS provides several dot commands1 (more on dot commands in Chapter 19 –
1 Dot commands are short programs residing in folder c:/dot/ which are used to extend NextZXOS, or to expose facilities not normally available to NextBASIC to the user. Dot commands were originally created for esxDOS (an alternative, free, ZX Spectrum–compatible Operating System which also works on the ZX Spectrum Next) and whose format was adopted by NextZXOS via its esxDOS emulation layer. Most esxDOS dot commands will work with NextZXOS and vice-versa unless they use some special facility not covered by either the esxDOS emulation layer or they are OS or machine dependent.
NextZXOS and alternatives), written by David Saphier and Kev Brady, that can be incorporated into your programs and which not only allow you to play any WAV file stored on SD Card media but also a plethora of digital audio formats.
Currently via NextZXOS you can play natively (you'll see why we explicitly mention it in a second) the following audio file types:
WAV
This is the standard audio format for most computers. The ZX Spectrum Next supports audio resolutions up to 32KHz. In order to playback a digital audio wave file, type:
.wavplay32 file.wav
where file.wav is the audio file you want to play. This can be accessed (like all other NextZXOS dot commands) from the 48K BASIC environment as well and fully incorporated into all your NextBASIC programs. You can find more information on how to access the digital audio hardware of your ZX Spectrum Next in Chapter 22 – IN, OUT and the Next Registers .
MOD
MODule files are one of the major standards for computer music and they comes from the Amiga and its ProTracker application. There are two ways you can play MOD files on the Next. You either use the dot command .nxmod with your selection of .mod file as an argument; for example:
.nxmod song2.mod
or you can use the native application NXModPlayer. This can be found under c:/apps/audio/NxModPlay/ accessible either via the Browser (See relevant section on the Browser in the next Chapter) or via the commands:
 a$ =
      "c:/apps/audio/NxMod/nxmod
      play.nex"
.nexload a$
PT3
PT3 is one of the de-facto standards for AY chip music, and the ZX Spectrum Next supports playback of up to 6 channel audio in two ways. First is via the dot command .playpt3 with the pt3 filename as an argument:
.playpt3 onlyyou.pt3
or via the application NextSID. This is a rather special application as it not only allows you to play back pt3 music files but also to apply SID-like effects to the channels. NextSID can be found under c:/apps/audio/NextSID. As with NXModPlayer above you can either start it via the Browser or via the commands:
  a$="c:/apps/audio/NextSID/nextsid.nex"
.nexload a$
Note that you will need a mouse installed.
Using the Pi accelerator for audio
If you have the Accelerated version of the ZX Spectrum Next, or have a Raspberry Pi Zero installed on your board, then you have more options available audio-wise. These include (but are not limited to) playback of:
- Commodore 64 SID files
- "Tracker" MOD files
- Atari ST SDH files
- MP3 files
- High definition wav files
and many, many more.
The way the system works is as follows: The ZX Spectrum Next communicates with the Accelerator via its secondary UART2 and sends commands and audio files to the specialised SUPervisor software that is running on the Raspberry Pi Zero. The Pi Zero in turn interprets these files and reproduces the audio contained therein via it's GPIO port onto the ZX Spectrum Next I²S3 port which in turn mixes it with the rest of its audio output and redirects it to whichever output you have available. In essence when it comes to playback, the ZX Spectrum Next is considered a "sound card" where the accelerator is concerned and two extra DACs where the ZX Spectrum is concerned. As a consequence you can have Digital Audio (on the ZX Spectrum Next), all three PSGs playing AND Digital Audio (on the Pi Zero) all playing simultaneously!
To use the Pi audio facilities you need to first enable the secondary UART and set it to the accelerator. In NextBASIC or the Command Line you must type:
CD "c:/apps/rpi"
and press ENTER. Then type:
LOAD "pi.bas"
You'll get a message stating 9 STOP statement, 50:1indicating the system is now ready to play audio using the Pi Zero. Feel free to poke about the listing of the PI.BAS program as it shows you the usage of Next Registers (see Chapter 22 for more).
Playing audio files requires a dot command called .pisend which you can find in c:/dot/ which serves a two-fold purpose: to send files to the Pi Zero's temporary storage and send the appropriate command for it to play. Thankfully D. Rimron-Soutter and David Saphier, maintainers of NextPi24 and .pisend respectively, have packaged all this nicely into little NextBASIC programs (located in c:/nextzxos/) which you can either call directly or via the Browser by selecting a filetype already registered. Currently registered filetypes include .SID, .MOD, .XM, .TZX and .SDH.
To illustrate how this works, we shall attempt to play an Atari™ SDH file. Assuming you have a SDH file named warhawk.sdh (search for it and download it on the internet; it's freely available) on the root of your SD card, playing it is as simple as:
LOAD "c:/nextzxos/sndplay.bas":
 f$="c:/warhawk.sdh":GO TO 10
The screen will read Playing... c:/warhawk.shd and the music will start playing from your speakers.
External Audio Output
If you are interested in doing more with sound from the ZX Spectrum Next, like hearing the sound that BEEP and PLAY make on something other than the usually limited audio of your display, you will find that the audio signal is also present on the Audio Out socket on the back of the machine. You may use this to connect to a pair of headphones or a higher quality amplifier. Note that this will not disrupt audio reproduction on the digital display ca-
2 UART or Universal Asynchronous Receiver-Transmitter is a hardware device that exchanges data sequentially between two systems. In our case this is done between the ZX Spectrum Next hardware and the Pi Zero accelerator via its GPIO port. 3: I²S or Inter-IC Sound is a serial bus interface standard to connect digital audio devices. 4: NextPi/2 is the operating system running on the Pi Zero accelerator that's purposely built to support the Next.
ble, therefore you may want to turn down the volume on your display before plugging an external audio reproduction device. Note also, that there is no volume control for the Audio Out socket so you should take that into account when using headphones or an amplifier.
Notes
TZX files are "perfect" ZX Spectrum tape images. Due to them being compressed, they require a much more powerful CPU than the Z80N present on the Spectrum Next in order to be decompressed to their original tape audio stream. While not audio in the strict sense we're discussing in this chapter, they do use the audio subsystem to be loaded on the ZX Spectrum Next side and as such they are covered here.
Exercises:
- Rewrite the Mahler program so that it uses FOR loops to repeat the bars.
- Program the computer so that it plays not only the funeral march, but also the rest of Mahler's first symphony.
- Repeat exercises 1 and 2 above by utilising PLAY instead of BEEP.
ZX Spectrum Next User Manual, 3rd Edition (ISBN 978-1-5272-5496-1), written and illustrated by Phoebus R. Dokos. Copyright © 2020-2024 Phoebus Dokos / SpecNext Ltd. Licensed under CC BY-NC-SA 4.0. This is a transcription and can contain errors; check any doubt against the printed page.