Pages 206–219 · Markdown
Chapter 20 – Channels, Streams, Drivers and Windows
As we have seen thus far, NextBASIC can read data from the keyboard and controllers using INPUT and INKEY$ and it can write data onto the display or a printer by using PRINT and LPRINT. However, these commands are really a form of shorthand designed to protect the user from some of the computer's more complex features.
To the PRINT command, for example, there is no difference between the screen and the printer. PRINT "Mikayla" really means: take the characters which make up the word Mikayla and send them somewhere else. It's just convenient to use the screen most of the time. Likewise, LPRINT usually sends data to the printer. In fact, what these commands really do is to send data to one of a number of channels.
Channels
A channel is the pathway to the computer's input and output devices and on the ZX Spectrum Next, they are designated by a letter. These are:
| Designator | Direction | Description | Default Streams | Default Status |
|---|---|---|---|---|
| k | Input/Output1 | Keyboard | 0,1 | Open |
| s | Output | Screen | 2 | Open |
| p | Output | Printer | 3 | Open |
| i | Input | File (input) | Closed | |
| o | Output | File (output) | Closed | |
| u | Input/Output | File (Update) | Closed | |
| v | Input/Output | Variable | Closed | |
| m | Input/Output | Memory | Closed | |
| d | Depends | Driver | Closed | |
| w | Input/Output | Windows | Closed | |
| r | Internal | Internal Use only | N/A | Open |
Table 19 – NextBASIC channels
To access a channel, it must be open. Opening a channel makes it ready to receive or produce data. A channel is opened by connecting it to a stream. From NextBASIC, you would use a command like:
OPEN #4,"k"
which means connect stream 4 to the keyboard channel. As evidenced by the table above, if we go by the direction of data flow there are three types of channels: Input, Output and Input/Output (or Update).
However, we can better classify channels by device type: We have Screen, Keyboard, Printer, File, Memory, Variable, Windows and Driver channels. Let's examine them according to the device type however, as this affects what types of commands we can use with them and how.
The Screen Channel deals with everything that goes to the screen. It is the simplest of all channels and most of its characteristics have been covered in Chapter 15 already. It is already opened and connected to stream #2. In fact you can substitute any PRINT command with PRINT #2 and it will work in the exact same way as a regular PRINT command.
1 Outputting data to the keyboard might seem a bit peculiar, but once you consider that the computer uses the lower screen (like INPUT does) to display the characters, it becomes clear why.
Similar things apply to the Keyboard Channel. This is already connected to two streams: #0 and #1 as we can see by the following little program:
10 INPUT #0;"Stream 0 Input: ";a$
20 INPUT #1;"Stream 1 Input: ";b$
30 PRINT a$'b$
The Printer Channel is also simple and by default attached to stream #3. As a matter of fact, giving **PRINT #**3 is basically a default2 longhand for LPRINT and similarly LLIST is basically the same as LIST #3.
Notes
As streams #0 to #3 are predefined and already opened, altering these may also alter the behaviour of the system, therefore you are advised to avoid the practice unless you exercise care.
Where things start to differentiate a bit is with the Files Channel. Firstly, no file channel is by default open, and secondly any file can be opened in 3 modes: Input, Output and Update (Input/Output). As the names imply, Input will only accept data FROM a file, Output will only direct data TO a file and Update will allow input and output of data TO and FROM a file. There are a couple of special considerations regarding file channels:
- You should always take care to close streams that have been opened to a file in Output or Update modes when you have finished, as otherwise data loss may occur. It is always good practice to do this even for files opened in Input mode (or streams open to other channels). The CLOSE command will be examined further below.
- Files saved by CP/M or a +3e, are usually stored as a number of 128-byte records and so you may read rubbish at the end of a file that comes from such a system if it is not an exact multiple of 128 bytes in length. NextZXOS however, reports proper file sizes and does not suffer from this problem even when it saves files on a +3DOS/IDEDOS drive.
File channels support all the pointer commands (more on these further below).
The Variable Channels can be used to direct output to or input from a string variable, which can be easily manipulated within a NextBASIC program. This would allow you to (for example) examine disk catalogues in your NextBASIC program, or make an auto-running game demo (by inputting from a string containing set keystrokes). The string specified must be a character array with a single dimension, large enough to hold the maximum amount of data you expect to have to deal with.
Variable Channels also support all the pointer commands.
The Memory Channel can be used in a very similar way to the Variable Channels. However, as it is a fixed memory region, it is more suitable for use by machine-code programs. It also requires you to reserve the memory beforehand.
The Driver Channels are special channels to exchange data with Device Drivers. Not every Device Driver can be addressed by a Driver Channel and not all Driver Channels have all options or can even access pointer commands. You will need to refer to each driver's documentation in order to know what is supported and what isn't.
Finally the most complicated Channels of all are the Windows Channels. Although they do not support any of the pointer commands, they are extremely flexible as they accept a large number of control codes as we've briefly mentioned in Chapter 14.
2 Default means in this context: "without parameters". As we will see further below, even LPRINT and LLIST behaviour can change
Windows, are defined by their top line (0-23), leftmost column (0-31), height (1-24), width (1-32), and optionally character size (3-8) and character set address. If no character size is specified, the default is 8. If a character set address is given, then this is used instead of the built-in fonts; this allows you to use nice fonts such as those provided with art programs and adventure games. Due to their complexity, we'll devote an entire section to Windows after we discuss streams and the commands with which we use them.
Streams
Streams3 are convenient ways for the computer to switch between channels by referring to them as numbers. This idea makes it possible to write programs that can send information to any device without having to use different commands. There are 16 total available streams numbered 0 to 15. 4 streams; 0 through 3, as seen on the table above, are already opened to channels k,s and p. Note here, that many streams can be attached to a channel depending on what we want to do.
Using Streams
All the above might seem complicated, and you may well wish to stick to the standard PRINT and INPUT commands – that's why they're there after all. Even these commands however, are just shortcuts to their "complete" versions that also include a stream number and the benefits of using channels far outweigh their perceived complexity.
Stream control commands
Since it's now evident that any device on the computer that accepts input or produces output is really a channel, it's easy to realise that we have been using streams all along; we've already visited PRINT and LPRINT (which are really the same command), used INPUT and INKEY$ and lastly, we've used LIST and LLIST (which also are the same command). All the above, have versions which include a # (hash) followed by a current stream number, so we are already halfway there!
Apart from these and OPEN # we saw in the channels section above, the following commands are available for working with streams: CLOSE #, DIM #..., DIM #...TO, NEXT #..., NEXT #...TO, POINT #..., RETURN #...TO, GOTO #...TO and COPY ...TO #, CAT # and PWD #. We'll examine them all below:
OPEN #n, channelspec
where n is the stream number4 and channelspec is a string that can be any of the following (capitals or lower case letters may be used), opens a stream and attaches it to the channel defined by channelspec:
| String | Description |
|---|---|
| "k" | The standard input channel (keyboard and lower screen). Streams 0 & 1 are normally set to this channel |
| "s" | The standard output channel (main screen). Stream 2 is normally set to this channel. |
| "p" | The standard printer channel (serial or parallel). Stream 3 is normally set to this channel. |
| "i>filespec" | This opens an input-only stream to an existing file. If the filename is at least two characters long, you can omit the "I>" as this will be assumed (single-character names require the "I>" as otherwise they will be assumed to be standard channel names). |
| "o>filespec" | This creates a new file and opens an output-only stream to it. |
3 On other versions of BASIC, streams are called channels and channels are called devices. This may be a bit confusing to a user coming from a different flavour of BASIC. The concepts however are basically the same. 4: Altering streams 0 to 3 will change the behaviour of the system and should be used with care.
| String | Description |
|---|---|
| "u>filespec" | This opens an existing file and opens an input/output-stream to it. |
| "m>address, length" | This opens an input/output channel to the memory area at address, length. |
| "v>x$" | This opens an input/output channel to the variable x$ which must be a character array with a single dimension, large enough to hold everything that will be output to it/input from it. |
| "w>line, col, ht, wid [, csize [, cset]]" | This opens an input-output channel to a text window on the screen, starting at character position (line,col), with a height of ht character rows and a width of wid characters. Optionally, a character width of csize (3-8px) may be specified. This does not affect the definition details of the window, which are always specified in 8px wide characters. A user-supplied character set may also be specified, located at address cset. See the Windows special section for details. |
| "d>driver_name>[driverspec]" | Opens a channel to driver_name, whose data flow direction is dictated by the driver it addresses. Driverspec is optional and depends on the driver (if needed or not). |
Table 20 – OPEN # channelspec setup strings
Here are some examples:
| OPEN #4,"o>a:test.txt" | Creates a file named test.txt on virtual disk drive a: and opens an output-only channel to it, connected to stream 4. |
| OPEN #5,"stuff" | Opens an existing file named stuff on the default drive and opens an input-only channel to it, connected to stream 5. |
Once a stream is opened, it can be used with the standard INPUT # and PRINT # commands, as well as the additional pointer commands. Before we get into those, we should just first mention:
CLOSE #n
which closes the previously opened stream #n. If n is a stream between 0 and 3, then the default channel for that stream (k, s or p) is reattached to it. Note, that attempting to CLOSE a stream that hasn't been opened, will not produce an error; instead it will exit gracefully with OK, 0:1. For example:
| CLOSE #4 | Closes the channel attached to stream 4. |
Streams, and especially those opened to large files, can be very long to navigate in a serial manner: imagine having a file that's 100 Kbytes long, you would have to iterate through 102400 characters to read the very last one byte. For that reason, NextBASIC maintains pointers to the position you're located within a stream, how long the stream is (in characters / bytes), the ability to move these pointers to any location within a stream and finally the ability to read one byte from the current pointer position from that stream. The commands and functions to do that are called Pointer Commands and are the following: POINT #... and RETURN #...TO, DIM#... and DIM #...TO, GO TO # and NEXT #...TO. Let's visit their syntax below:
POINT #n
RETURN #n TO [%]var
This command returns the current position of stream n. It's the same as the RETURN #...TO with the exception that no variable assignment is done to the resulting value. If the RETURN variant is used, then it also stores it in variable var. The variable can be an integer one, which means that it will accept –safely– positions of up to 65536 bytes within the stream (or a maximum value of 65535 as position 0 is the very first position within a stream). Do not use integer values if you plan on accessing streams larger than that! If you don't use the TO variant however you can use it as part of the regular expression evaluator.
DIM #n
DIM #n TO [%]var
This command returns the size (in characters or bytes) of stream n. Whatever applies to the RETURN #...TO variant of POINT # applies to the DIM #...TO as well. Variable var stores the size of the stream. As with RETURN #...TO above, var can be an integer variable in which case the same warning as with the previous section applies.
GO TO #n, [%]pos
This command sets the current position of stream n to position pos. Let's see how the previous three commands all tie together by experimenting with browser.cfg:
10 OPEN #4,"/nextzxos/browser
   .cfg"
20 REM "i>" is optional since
   the filename is longer
   than 1 character
30 DIM #4 TO %a: REM Get
   filesize and put it in %a
40 RETURN #4 TO %b: REM Get
   current location and put
   it in %b
50 PRINT "You're in byte: ";
   %b ; " of "; %a
60 GO TO #4, %a/2: REM Move
   to the middle of the file
70 RETURN #4 TO %b: REM Get
   current location and put
   it in %b
80 PRINT "Now, you're in
   byte: "; %b ; " of "; %a
90 CLOSE #4
NEXT #n TO [%]var
This command gets the next character of input from stream n. As with POINT # and DIM #, if used with the TO modifier it also stores it in the variable var. If used on the standard k channel, this is similar to the INKEY$ function, except that it always waits for the next character to become available (ie on the k channel, it waits for a keypress). Using an integer variable here, is safe as the command gets one character at a time ergo one byte so its value will never exceed 255.
You can use this command instead of INPUT # on all channels that accept input otherwise they're very much identical in function.
Try this little program which will turn your ZX Spectrum Next into a typewriter:
10 NEXT #0 TO x
20 PRINT CHR$(x);
30 GO TO 10
Alternatively you could change line 10 to:
10 x=NEXT #0
which does the same thing!
COPY filespec TO #n
We've seen this command sequence before in a shortcut which did not include a stream number but rather a keyword: SCREEN$. In that case n is the stream to channel s which by default is #2. When used with a stream number, COPY...TO #n, can be used to transfer the contents of a file to a stream. For example to write the extended version of COPY "c:/readme.md" TO SCREEN$ we should type:
COPY "c:/readme.md" TO #2
When NextBASIC is running, it has four streams normally open. Streams #0 and #1 are connected to the keyboard (channel k), and are used by INPUT and INKEY$. Stream #2 is connected to the screen (channel s), and is used by PRINT, LIST, CAT and PWD, commands in other words that print something to the screen. Stream #3 is connected to the printer (channel p), and is used by LPRINT, LLIST and COPY (without parameters). All of these commands can be redirected to use another device by including a # followed by an open stream number, so
PRINT #1;"This is the lower screen"
will print the message on the lower screen while
PRINT #3;"Who needs LPRINT, Romulus?"
will use the printer. Conversely, LPRINT can behave like PRINT and typing:
LPRINT #2;"Are you confused yet Roy?"
makes LPRINT #2 do what PRINT normally does.
Notes
INPUT # may be used with other channels other than k and w such as file(i,o,u), memory (m) and variable (v) channels. In these cases, it is advisable to avoid any accidental outputs to the channels, by not using any prompt strings, and by using only the semicolon as a separator. In most cases, you will want to input a string using the LINE (See Chapter 14) modifier as without this, the data in the file (or other channel) would need to be surrounded by quotes.
The Variable and Memory Channels
In the previous chapter, we've examined a special dot command (.$) that allowed NextBASIC to talk to any dot command not made specifically to interact with it. The Variable and Memory Channels can be seen as facilitating the reverse flow of information; to get information from the outside world into NextBASIC. They both involve reserving some space beforehand to accept the input but they differ in the sense that the former can be moved anywhere in memory (as variables could be stored anywhere) while the latter is a fixed location (which makes it more suitable for use by machine code programs). You may remember the series of commands we used to get the output of PWD in Chapter 19 or .time in Chapter 17. Let's remember them quickly:
DIM d$(255):OPEN #2,"v>d$":.cd --verbose:
CLOSE #2: PRINT d$
and
DIM t$(100):OPEN #2,"v>t$":.TIME :CLOSE
#2:PRINT t$
but now that you know a bit more about streams, should that even work? The answer is yes, as it's designed to work that way. Most dot commands that produce textual output in a "legal" way (that is without circumventing NextZXOS), will attempt to output content on stream #2. By opening stream #2 to the variable channel and then executing the command whose output we wish to capture, we're performing a temporary redirection of the screen stream to the variable channel. Then, once we close the stream again, as the system is designed to do, it resets it to its default channel s and reopens it. Obviously if a program does not use the inbuilt NextZXOS and NextBASIC routines to produce output, this will produce nothing. The example below, shows a more "traditional" way of using the variable channel by using the inbuilt facility of a command (CAT ASN in this case) to output to a different channel:
10 DIM a$(1000)
20 OPEN #8, "v>a$"
30 CAT #8 ASN
40 RETURN #8 TO l
50 PRINT "Assignment length
   is:";l;" chars"
60 PRINT "List is:"
70 PRINT a$( TO l)
80 CLOSE #8
Notes
If a stream operation fails (like in the example above), the stream will not automatically close. It is therefore a good practice to start all your programs that operate on a stream with a CLOSE # prior to actually performing an OPEN # operation for the first time. It's also even better programming practice to include ON ERROR error-trapping, on every stream operation (especially the ones that operate on File Channels) as a lot of things can go wrong while working with files and channels in general (e.g. Running out of data, or your reserved memory area was smaller than the one you should have reserved etc).
As you can see line 40 also demonstrates the use of a pointer command in the variable channel. If you do not reserve enough room (for the sake of displaying the results, change the size of a$ to just 10 characters from the 1000 it has) you will receive an 8 End of File error at line 30.
The memory channel operates in a very similar manner; once you reserve the space, you open it and dump the output to it. Let's modify the above program to use the memory channel:
10 CLEAR 29999
20 OPEN #8, "m>30000,1000"
30 CAT #8 ASN
40 RETURN #8 TO l
50 PRINT "Assignment length
   is:";l;" chars"
60 REM perform some magic
   here via MC
70 FOR f = 0 TO l-1
80 PRINT CHR$(PEEK(30000+f));
   :REM print the l first
   bytes you stored in memory
90 NEXT f
80 CLOSE # 8
Installable device drivers and Driver Channels
As mentioned in the previous chapter, NextZXOS allows for installable device drivers. A maximum of 45 of those can be installed.
These are mainly intended for use as software that allows access to external or internal peripherals such as printers, mice, network devices etc, but can also be used for other purposes, such as a potential NUL driver which does nothing. (The notion of a device that does nothing is a bit peculiar but it has its uses in computing!). As mentioned in Chapter 19, to install or uninstall a driver, you need to use the following dot commands respectively:
.install drivername
.uninstall drivername
where drivername is the name of the file which contains the code for each driver. For example the WiFi driver for the ESP chip that your ZX Spectrum Next may have come with or you may have installed yourself is espat.drv.
The documentation that comes with the driver will describe how to use it. Some drivers for example may make use of the new DRIVER command. This has the following form:
DRIVER driverid, callid [,n1[,n2]] [TO var1[,var2[,var3]]]
where n1 and n2 are optional values to pass to the driver, and var1, var2 and var3 are optional variables to receive results from the driver call. The individual DRIVER commands that you can use, depend on each device driver and they will also be in the driver's accompanying documentation.
Driver Channel support
Some drivers can support input/output via streams and the Driver Channel d. If so, the documentation will describe the exact format it supports. Generally speaking however, in order to open a stream to channel d, you will be using one of the following command variants (assuming the driver id is ASCII X):
OPEN #8,"d>X"
which opens stream #8 to simple driver channel for device X.
OPEN #8,"d>X>string"
which opens stream #8 to channel d as described by string on device X.
OPEN #8,"d>X,p1"
which opens stream #8 to channel d as described by numeric value p1 on device X.
OPEN #8,"d>X,p1,p2"
which opens stream #8 to channel d as described by numeric values p1 and p2 on device X.
5 This number may change in subsequent versions of NextZXOS
To close the driver's stream, you will use a standard CLOSE # command (in the examples above that would be CLOSE #8).
Once the driver's channel is open, you can use any of NextBASIC's stream input, output or pointer manipulation commands (if these are supported by the loaded driver; Usually each driver's documentation should describe what can be used).
A good example of using the driver channels can be found in the documentation for the ESP (WiFi) driver by Tim Gilberts, included in the c:/docs/extra-hw/ folder of the System/Next™ distribution. You can see there for example that talking to the internet via NextBASIC can be as simple as:
OPEN #4,"d>N>TCP,145.239.200.34:80"
which will open a TCP connection to port 80 on specnext.dev
Windows
NextBASIC offers the ability to create and manipulate text "windows" on screen via its Window Channels. This allows for immense flexibility in manipulating textual output, going beyond what simple PRINT commands can.
System Windows vs User Windows
When we talk about Windows, we're really talking about two kinds; System and User Windows. The former are created and managed by NextBASIC while the latter are created and controlled by the user. By default, 4 System Windows are created; one for each Layer other than 0. These are full screen and are used to produce output through the standard s channel and only a few parameters of these can change (size always remains the maximum possible).
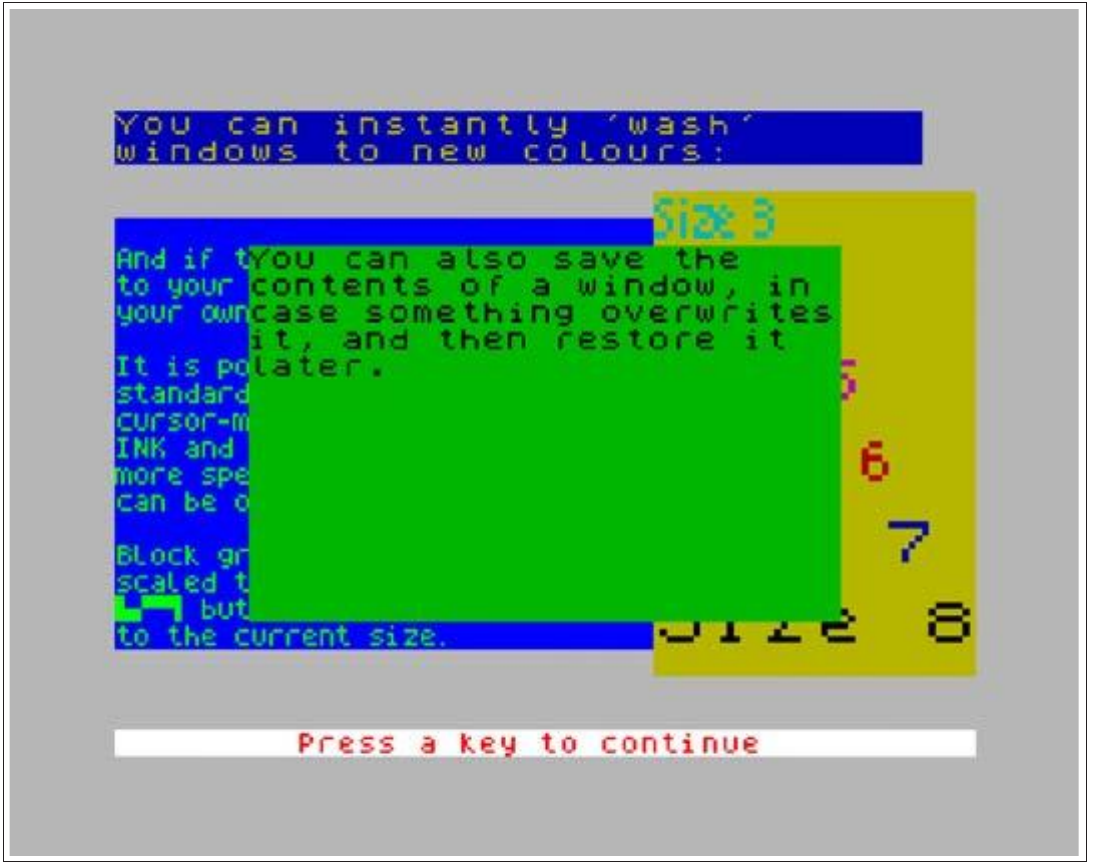
You can instantly 'wash'
windows to new colours:

                                Size 3
And if tYou can also save the
to your contents of a window, in
your owncase something overwrites
        it, and then restore it
It is polater.                   5
standard
cursor-m                          6
INK and
more spe
can be o                          7

Block gr
scaled t
[graphic] but                    Size 8
to the current size.

Press a key to continue
Fig. 33 – NextBASIC Text Windows
User Windows on the other hand can have varying sizes and can be defined anywhere in the screen. From now on, we'll refer to System Windows as SW and to User Windows as UW. If no designation exists, then the discussion applies to both types.
Defining User Windows
User windows are defined by their top line (0 to 23), leftmost column (0 to 31), height (1 to 24), width (1 to 32), and optionally by character size (3 to 8) and character set memory address6.
6 Memory address refers to an address location within the main memory map.
If no character size is specified, the default is assumed which is 8 px wide. If a character set address is given, then this is used instead of the built-in fonts8; this allows you to use nice fonts such as those provided with art programs and adventure games.
The character size, has no bearing on the way the window is defined, but it does affect the number of actual columns you have available. For example, the following defines a window the size of the entire screen; but because a character size of 5 is specified, the number of characters that can be printed in the window at any time is 24 x 51:
OPEN #5,"w>0,0,24,32,5"
When outputting via PRINT to windows, you can use many of the same control functions as you can with the normal screen. For example: ' (apostrophe); start a new line, , (comma); start a new column, TAB, AT, POINT, INK, PAPER, FLASH, BRIGHT, INVERSE, OVER.
When first defined, windows are in non-justified mode, but they can be set to be left, full or centre justified. Note that in justified mode, some features and control codes cannot be accessed, so you may need to switch back to non-justified mode to use them.
A complete list of control codes follows in the table below; these codes can be sent to a window using PRINT followed by the CHR$ function as we've already seen in Chapter 14. Note that it's always preferred to use standard PRINT, AT, INK etc commands instead of control codes when using windows as they're usually easier to use than their control codes counterparts. Below is a list of all control codes that can be used while outputting to a Window Channel's stream.
NOTE that wherever there are sequential numbers they must be given using semicolon separated CHR$ statements. For example:
PRINT CHR$ 29; CHR$ 2;
| J | Code | Description | |
|---|---|---|---|
| UW | SW | ||
| 0 | Turn justification off | Increases the current character set width (can range from 3 to 8 pixels), and moves the cursor to the start of the next line. | |
| 1 | Turn justification on | Decreases the current character set width (can range from 3 to 8 pixels), and moves the cursor to the start of the next line. | |
| 2 | Save current window contents | Causes the size 8 character set to be replaced with the character set defined by the CHARS system variable. | |
| 3 | Restore saved window contents | Causes the sizes 3 to 7 character sets to be regenerated | |
| 4 | Home cursor to top left | ||
| 5 | Home cursor to bottom left | ||
| × | 6 | Tab to left or centre of window (PRINT ,) | |
| 7 | Scroll window | ||
| × | 8 | Move cursor left | |
| × | 9 | Move cursor right | |
| 10 | Move cursor down | ||
| 11 | Move cursor up | ||
| × | 12 | Delete character to left of cursor | |
8 A font is a collection of a stylised graphical representation of characters . For the ZX Spectrum Next, this follows the 8x8 pixel matrix of the UDGs and it is exactly 768 bytes long (defining 96 characters in the 7-bit Sinclair ASCII series from 32 to 128). See Appendix A for a list of characters.
| J | Code | Description | |
|---|---|---|---|
| UW | SW | ||
| 13 | Start new line (PRINT ') | ||
| 14 | Clear window to current attributes | ||
| 15 | Wash window with current attributes8 | ||
| ● | 16; n | Set INK n (where n=0 to 7) | |
| ● | 17; n | Set PAPER n (where n=0 to 7) | |
| ● | 18; n | Set FLASH n (where n=0 or 1)9 | |
| ● | 19; n | Set BRIGHT n (where n=0 or 1)9 | |
| ● | 20; n | Set INVERSE n (where n=0 or 1) | |
| ● | 21; n | Set OVER n (where n=0 or 1) | |
| × | 22; y; x | Sets cursor to pixel line y, character size column x. (AT y,x). Position is specified in terms of character positions (dependent upon the character size currently selected and whether reduced-height text is in operation. Double-width and double-height do not affect the coordinates, however) | |
| × | 23; nLow; nHigh | TAB to (character sized) column n. This is a 16bit number so for column numbers smaller than 256, nHigh is always 0. Otherwise n is calculated as nLow+(nHigh*256) | |
| ● | 24; n | Sets ATTR n (Where n=0 to 255)10 | |
| × | 25; y; xLow; xHigh | Changes the print position to pixel coordinates x, y (0 to 511 and 0 to 191 respectively). Since we may be running at Layer 1,2 mode (HiRes) and the x position may be higher than 256 pixels (ergo a value larger than what a single byte can hold) it breaks the x coordinate into two byte components: xLow (0 to 255) and xHigh (0 to 1). For horizontal resolutions up to 256 pixels, xHigh is always 0 while for resolutions > 256 pixels it may be 0 or 1. The x coordinate is calculated as (xLow) + (xHigh*256) | |
| ● | 26; n | Auto-pauses every n character lines. After each n character lines have been scrolled out of the window, output will automatically pause until the SPACE key is pressed (the bottom right character in the window will be flashed to indicate SPACE is being waited for). After a window has been cleared, the first pause occurs before any lines have been scrolled out; subsequent pauses wait for n character lines. Typically you would want to set n to the height of the window. If set to 0 (the default), auto-pause is disabled. | |
| ● | 27; n | Fills window with character n. Attributes and cursor position are affected. | |
| × | 28; n | Sets double width (where n=1) or normal width (where n=0) | |
| ● | 29; n | Sets height n (0=normal, 1=double, 2=reduced, 3=double reduced) – See Chapter 14 for details | |
| 30; n | Selects justification mode n where n is 0=Left Justified , 1= Fully Justified and 2 =Centre Justified | Changes the current character set width to n (can be 3,4,5,6,7 or 8 pixels), and moves the cursor to the start of the next line. | |
| 31; n | Selects whether embedded codes are permitted (1) or not (0) in justify mode | Causes the size n character set to be replaced with the character set defined by the CHARS system variable. | |
Table 21– Window control codes
In the table above on the column marked as J an × means ignored if issued in justified mode and an ● means code can be used in justified mode only if the "embedded codes" setting has been enabled. For control codes normally ignored in justified mode, note that these will still be taken into account if you set them before entering justified mode.
User character sets
If the default character set(s) are replaced using control codes 2, 3 or 31 in a system window, any subsequent text printed in any window (which doesn't have its own user-defined character set) will use the new character set(s).
The system-defined character sets are partially shared: sizes 3 and 4 use the same set (only the leftmost 3 pixels are used for size 3), and similarly so do sizes 5 and 6. This should be borne in mind when replacing system character sets using control code 31.
8 Has no effect on Layer 2 or LoRes 9: Ignored unless in Standard or HiColour modes and EnhancedULA is not enabled 10: Ignored in LoRes, Layer 2 and HiRes modes
Window input
Text windows support the INPUT command. If you use INPUT #, then a cursor is added to the window at the current position. You can then input any text desired, using the left and right arrows to move along the text input so far, or the up and down arrows to move to the start or end of the text.
The DELETE key deletes the character to the left of the cursor, and the ENTER key completes the input. Up to 191 characters can be accepted into each input variable.
Window definitions
Since windows are defined using character squares so for example in LoRes, this means the maximum window size is 16 × 12 (and not 32 × 24). In HiRes however, character squares are considered to be 16 pixels wide, so the maximum window size is still 32 × 24 pixels.
Memory constraints
It should be noted that saving/loading window contents (only available on user windows) is a costly operation. The amount of memory required for each character square is:
- 9 bytes (Layer 0)
- 16 bytes (Layer 1 HiRes or HiColour)
- 64 bytes (Layer 1 LoRes or Layer 2)
For example, a 10 x 10 window in Layer 2 requires 6400 bytes of available memory for saving its contents.
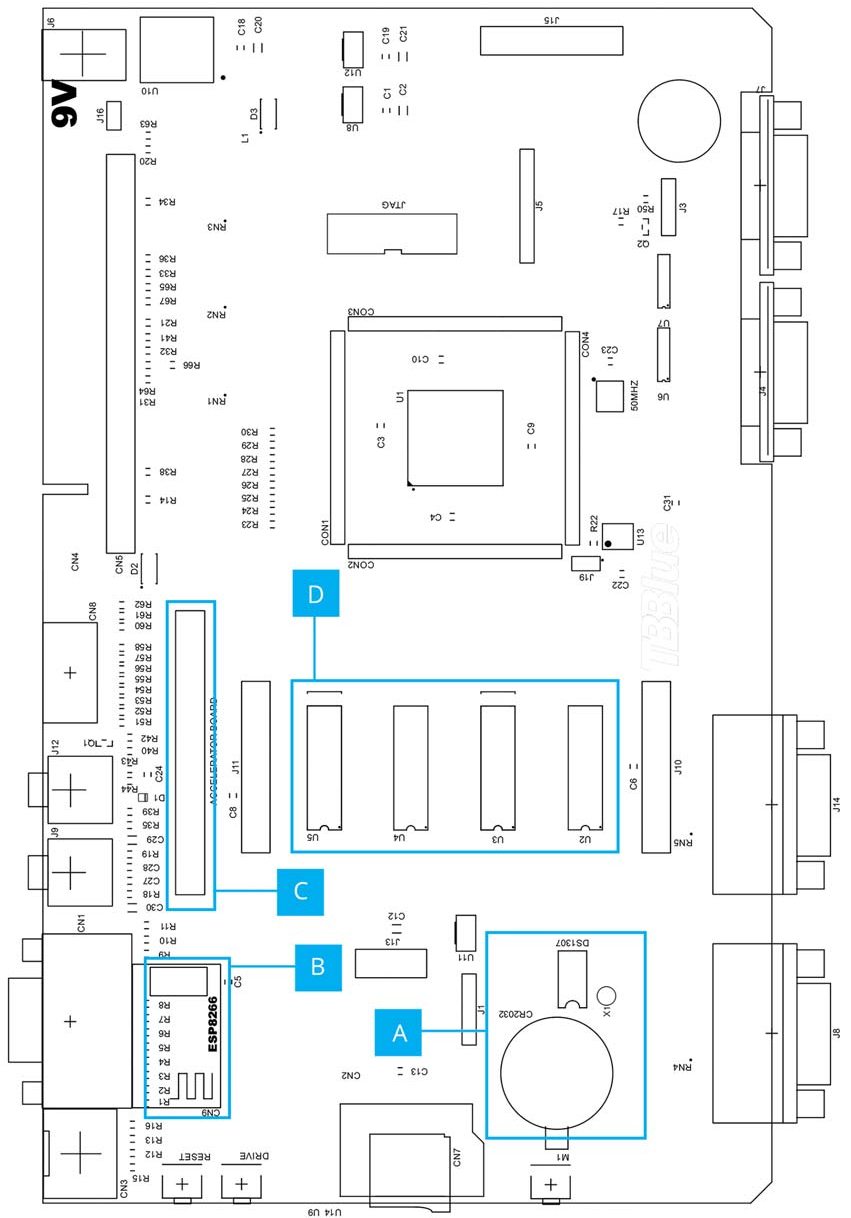
Diagram Legend
⚠
WARNING! WARNING! WARNING! WARNING!
Before attempting any hardware addition, make sure all
power is disconnected first!!!
ALL USER APPLIED MODIFICATIONS COME AT THE
USER'S OWN RISK.
!!!IRREPARABLE DAMAGE MAY OCCUR!!!
| # | Description |
|---|---|
| A | Real Time Clock |
| B | WiFi module (ESP) |
| C | RPi0 Accelerator |
| D | Memory |
The ZX Spectrum Next Issue 2 Mainboard with optional equipment locations
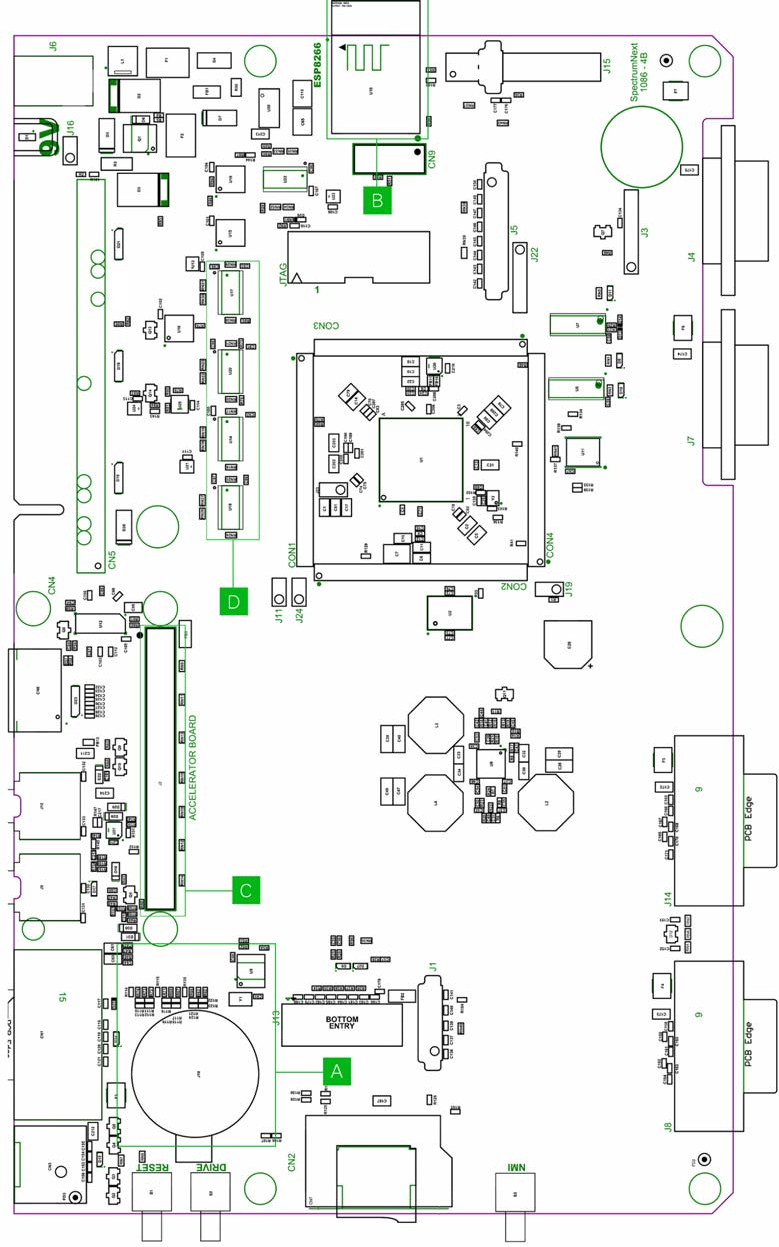
Diagram Legend
⚠
WARNING! WARNING! WARNING! WARNING!
Before attempting any hardware addition, make sure all
power is disconnected first!!!
ALL USER APPLIED MODIFICATIONS COME AT THE
USER'S OWN RISK.
!!!IRREPARABLE DAMAGE MAY OCCUR!!!
| # | Description |
|---|---|
| A | Real Time Clock (installed) |
| B | WiFi module (ESP) (installed) |
| C | RPi0 Accelerator (optional) |
| D | Memory (installed) |
The ZX Spectrum Next Issue 4 Mainboard with equipment locations
ZX Spectrum Next User Manual, 3rd Edition (ISBN 978-1-5272-5496-1), written and illustrated by Phoebus R. Dokos. Copyright © 2020-2024 Phoebus Dokos / SpecNext Ltd. Licensed under CC BY-NC-SA 4.0. This is a transcription and can contain errors; check any doubt against the printed page.