Pages 297–302 · Markdown
Appendix C – Machine Personalities
Overview
Your ZX Spectrum Next computer is unique in the fact that unlike other computers that emulate older machines using software, it changes its actual hardware to reflect the hardware of an older ZX Spectrum model. This fact, is what allows it to achieve almost 100% compatibility with older models whereas even a ZX Spectrum 128K for example couldn't run a lot of software originally made for the 48K.
The technology that makes all this possible is contained within a very large reconfigurable logic device called a Field Programmable Gate Array (FPGA).
For all purposes, once your ZX Spectrum Next goes into an older ZX Spectrum model personality, it's almost identical to that model internally. Moreover, since FPGAs can be made into almost any conceivable kind of digital circuit using a Hardware Description Language (HDL), your ZX Spectrum Next can become other machines using different CPU models; this is what we call multicore capability.
Before we examine what machine personalities are available on the ZX Spectrum Next, it is a good idea to start with learning about how to update the machine's core(s), firmware and system software.
The Cores and their update procedures
The ZX Spectrum Next is primarily a ZX Spectrum computer; its main core will always be one of a ZX Spectrum compatible machine (albeit with many extra features) however since it is also a multicore machine, it has two separate (but very similar) procedures to update its main core and a third one for additional cores1.
Let us first clarify a few things about what a core is and what it isn't. A core is a bitstream written in an HDL, "compiled" for the specific models of Xilinx™ FPGA the ZX Spectrum Next Issues 2 and 4 use and stored onboard a serial flash rom IC on the ZX Spectrum Next board. It contains all the logic that allows the FPGA device to reconfigure itself into the individual components that make up a ZX Spectrum Next. Every time you turn on your ZX Spectrum Next the core gets tranferred to the FPGA almost instantaneously. It doesn't get etched permanently inside the FPGA; instead the FPGA is empty every time the computer gets powered up.
We may be talking about one ZX Spectrum Next core but in reality due to the two production mainboards in existence (each with a different model of a Xilinx-brand FPGA), there are four; there are two Anti Brick cores (AB) and two regular cores you get with every new System/Next™ update. The AB cores serve two purposes: The main is to perform the inital machine startup and the secondary is to protect you from a botched attempt to flash a new core into the system's flash rom (hence the name Anti Brick2).
Every time the computer starts it transfers the AB core onto the FPGA, then the AB core loads the Firmware file from the root folder of the System/Next™ distribution and that in turn loads the regular core into the FPGA, then loads the appropriate configuration and finally starts the machine.
The AB core does not get updated; only the regular core is. The AB core needs a special procedure which is done at the factory to get updated so it won't be covered here.
There are two methods of updating the regular core; the first one is the normal one, and the one you should use while the second one is reserved only if told so by the release
1 SpecNext Ltd does not offer additional cores at the time of writing; 3rd party cores are the responsibility of their respective authors 2: Bricking is a term used for a failed update in digital electronics that leaves a device unusable; in other words unmovable as a "brick".
notes of a System/Next™ distribution or because your update somehow failed (for example lost power while updating).
The regular core (for both Issue 2 and Issue 4 mainboards) is contained within a file named TBBLUE.TBU. In order to update the flash rom you need to place it on the root folder of your SD Card together with the file containing the firmware: TBBLUE.FW. Both of these files need to be present for a successful update. Regular operations, however , require only the TBBLUE.FW file to be present at all times in the root of your System/Next™ distribution. Regardless of the update method you need to have them both so make a note for that.
Just placing a TBBLUE.TBU file on the root of the card won't update the core; there are additional steps you need to take. Let's examine the two update options below.
Regular Core update
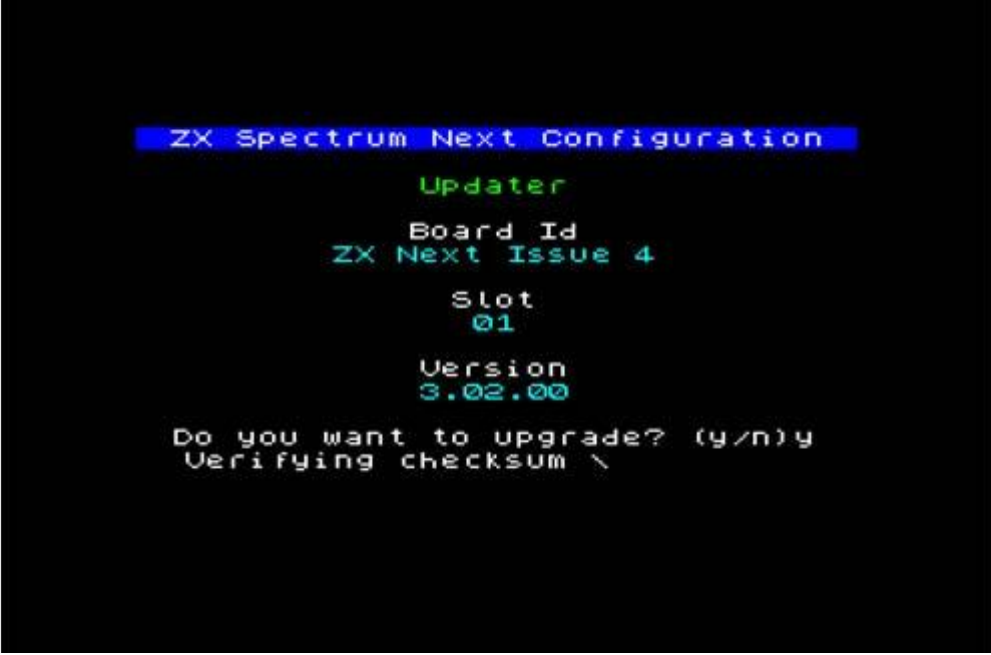
The regular core update method is quite easy. After you've made sure you have the TBBLUE.FW and TBBLUE.TBU on the root folder of your card, press and hold U on your keyboard and while doing that, long3 press the RESET button. Do not release the U key until you see the following screen (Note that if you have a KS1 ZX Spectrum Next, an N-Go computer or a KS1 dev board your Board Id will say ZX Next Issue 2):
                    ZX Spectrum Next Configuration

                            Updater

                           Board Id
                        ZX Next Issue 4

                             Slot
                              01

                            Version
                             3.02.00

                 Do you want to upgrade? (y/n)y
                  Verifying checksum \
Fig. 50 – Core update screen
Release U and then press Y. The updater will first calculate the checksum of the core bistream; once it finds everything is OK, it will start upgrading; first erasing the Flash ROM and then, once done successfully, writing the core bistream from TBBLUE.TBU in its place. Once the procedure has finished, you will receive an: Updated! Turn the power off and on. message. Remove the power and if using an HDMI display, the display cable as well. Wait a few moments and then reconnect everything. The machine should restart with the new core.
AB Core update
If the process failed somehow; or if you're so instructed by the accompanying notes of your System/Next™ distribution, you can do an AB core update to remedy the situation. This is a bit more complicated and it's made so as to avoid entering this mode by mistake.
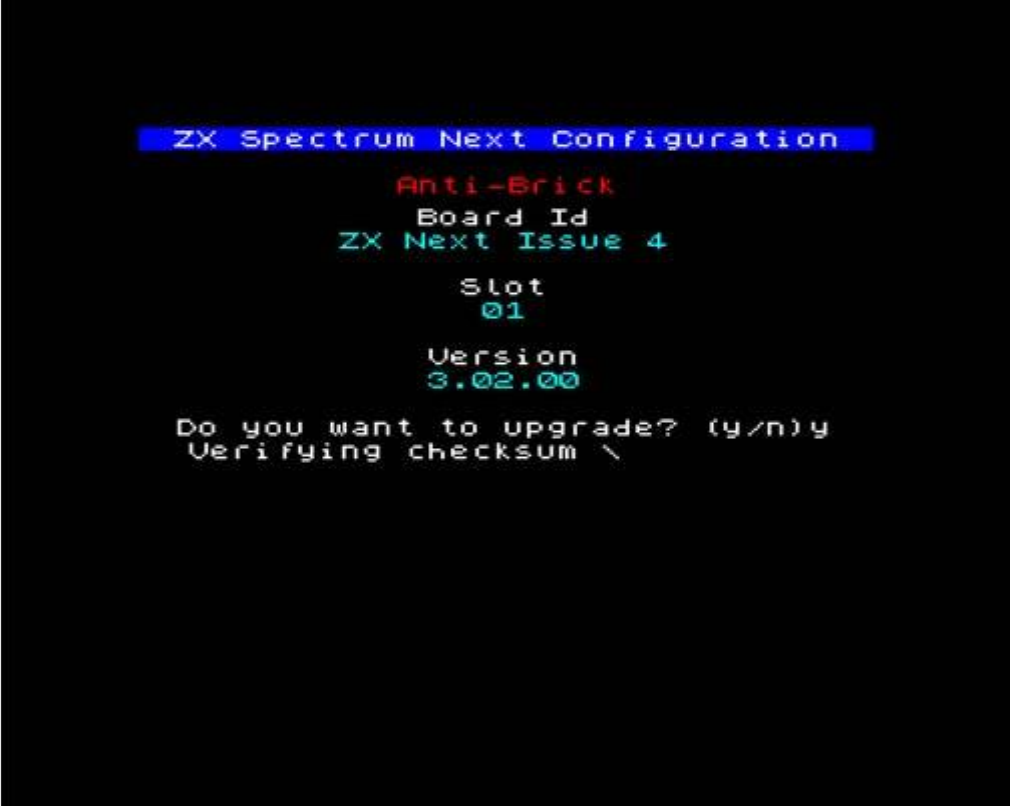
To enter AB core update; you will need to power off your machine, then press and hold the NMI and Drive buttons together (on the side of the computer) and while doing that reat-
3 More than 1 second
tach the power cable. Wait a few moments then release both keys. You should see the following screen:
                    ZX Spectrum Next Configuration

                           Anti-Brick
                           Board Id
                        ZX Next Issue 4

                             Slot
                              01

                            Version
                             3.02.00

                 Do you want to upgrade? (y/n)y
                  Verifying checksum \
Fig. 51 – AB Core update screen
If the display is blank, press F3 on the keyboard. Note that due to AB core using the NMI and Drive buttons you cannot press F3 using the NMI + 3 shortcut so you must have a PS/2 keyboard for that.
The display could be blank because the AB core works at 60 Hz in VGA mode only so if your display cannot "lock" onto that mode and you have no PS/2 keyboard to attach, you will need to do a so-called "blind update". You can still press y and more than likely the update will finish however if you have no display, the preferred method of performing said update is by pressing the NMI button once which in AB core update is a shortcut for y while the Drive button is a shortcut for n. If you do perform a "blind update" you should allow the machine adequate time to finish.
Please note that on an Issue 4, the average AB update time is 15 minutes from the time you press y so allow about 20 minutes before turning the power off.
Multicore (Extra Cores) update
The Extra Cores update deals with the optional third party cores the ZX Spectrum Next accepts. The process is similar with two exceptions. You will need a file called CORExxx.BIT where xxx is a number from 001 to 031 instead of the TBBLUE.TBU placed in the root folder of your System/Next™ distribution and you enter it by pressing and holding C instead of U while in NextZXOS. Every other step is exactly the same. Your 3rd party core will come with instructions on what to do and how to start the core. Generally speaking, files specific to that core go under the c:/machines/ folder, into one subfolder specific to that core. So if, for example, a QL core was released, you would find all pertinent files into c:/machines/ql/.
Updating the firmware
In ZX Spectrum Next terminology, firmware is the file called TBBLUE.FW that's located in the root folder of the SD card that holds your System/Next™ distribution. It is impossible to start the machine without it, as it's a special program that configures all aspects of the machine regardless of personality and core. To update it, you only have to copy the new version over the previous TBBLUE.FW version. The current FW version is reported on the boot screen. See your Quick Start Guide to see how the core gets reported while booting.
Updating the System/Next™ distribution
Every time a new version of NextZXOS with additional features gets released, it gets pushed to the System/Next git repository. Same thing happens with every software tool, firmware version and core that adds some feature or fixes a bug. A new System/Next™ will get released in a complete image form only when enough components have been updated as the process is very time consuming and only a large enough update on many components warrants this. So your system updates may be complete (ie. replacing all the components in the system in one go; firmware, core, operating system AND supporting tools) or just partial. You can update your System/Next™ distribution partially by going to the git repository at: gitlab.com/thesmog358/tbblue/ downloading the individual component and replacing it on your card. When updating NextZXOS, refer to Chapter 19 to find out which files are absolutely required because they all need to be updated together.
That being said, NextZXOS attempts to make things easier for you by using an inbuilt "Updater" program. After downloading the appropriate / latest .DSU update file from www.specnext.com/latestdistro/ you need to place it on your SD card's root and then launch the NextZXOS Startup Menu, navigate to More… then go to Tools and select Updater. NextZXOS will locate the file and do everything for you!
Alternatively you can choose to download the entire distribution from git in one go by selecting the download button on the right top part of the distribution page.
If you do not feel adventurous however, the official home for the System/Next™ distribution is: www.specnext.com/latestdistro/ which also contains links to other forms of the distribution such as complete SD card images in various sizes for direct burning onto SD cards. Alternatively you have the option of purchasing a new SD card with the latest distribution on it from the SpecNext Ltd store.
Selecting and configuring a personality
When powering up the system, you're presented with the boot screen, where, as we saw in the Quick Start Guide you're presented with the option of entering the Test Screen or to Press SPACEBAR for Menu.
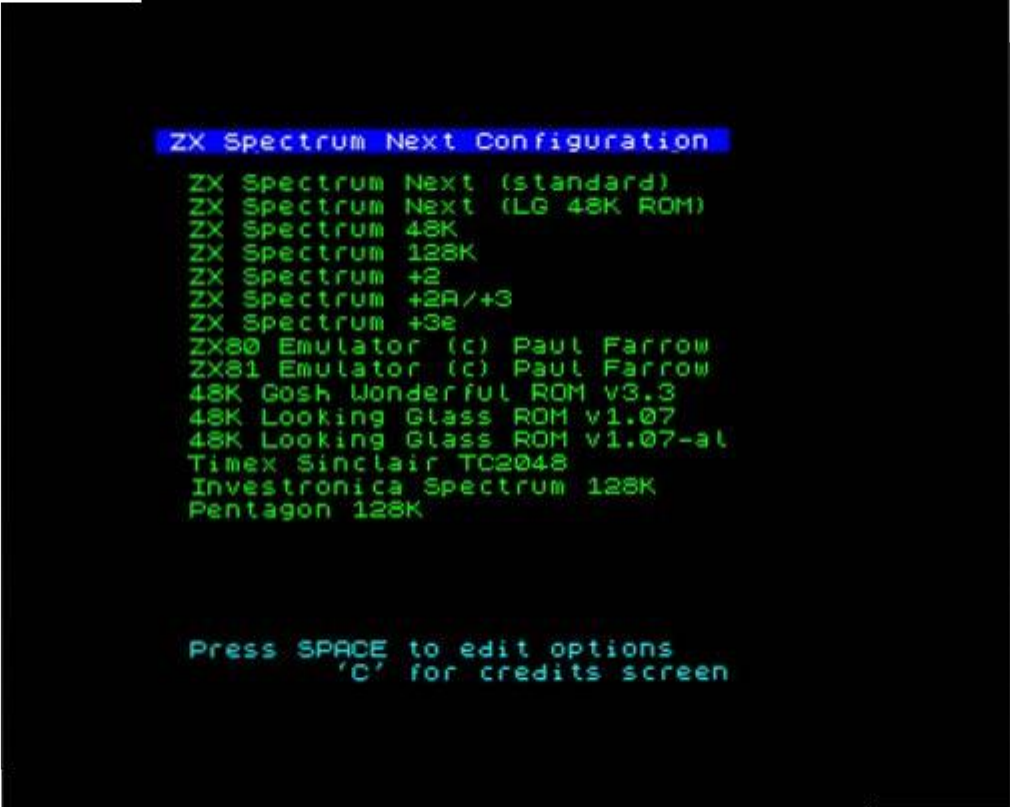
Pressing SPACE (be quick or the option will disappear and booting will continue) will present you with the following screen:
ZX Spectrum Next Configuration

 ZX Spectrum Next (standard)
 ZX Spectrum Next (LG 48K ROM)
 ZX Spectrum 48K
 ZX Spectrum 128K
 ZX Spectrum +2
 ZX Spectrum +2A/+3
 ZX Spectrum +3e
 ZX80 Emulator (c) Paul Farrow
 ZX81 Emulator (c) Paul Farrow
 48K Gosh Wonderful ROM v3.3
 48K Looking Glass ROM v1.07
 48K Looking Glass ROM v1.07-al
 Timex Sinclair TC2048
 Investronica Spectrum 128K
 Pentagon 128K


 Press SPACE to edit options
          'C' for credits screen
Fig. 52 – Personality Selection Screen
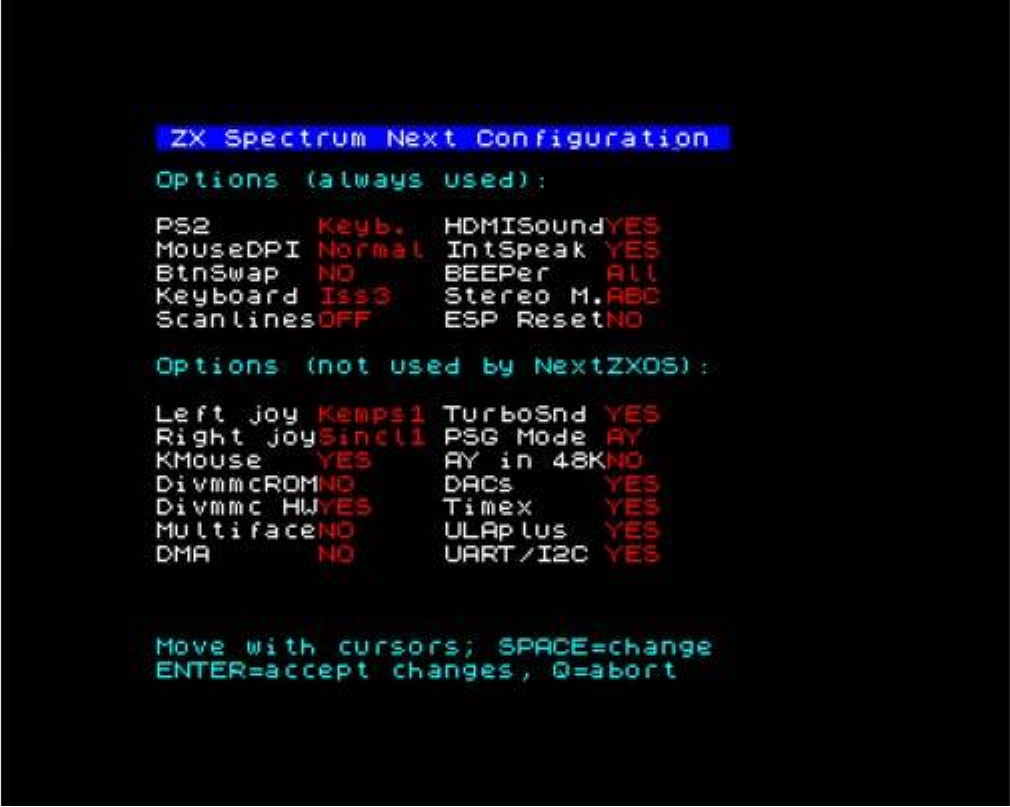
By using the cursor keys and ENTER you can select a new personality which will then become your default one and all subsequent boots will get you into that. Selecting however
a personality and pressing E will allow you to configure the specific personality further. Doing so will present you with another screen:
 ZX Spectrum Next Configuration

Options (always used):

PS2      Keyb.  HDMISoundYES
MouseDPI Normal IntSpeak YES
BtnSwap  NO     BEEPer   All
Keyboard Iss3   Stereo M.ABC
ScanlinesOFF    ESP ResetNO

Options (not used by NextZXOS):

Left joy Kemps1 TurboSnd YES
Right joySincl1 PSG Mode AY
KMouse   YES    AY in 48KNO
DivmmcROMNO     DACs     YES
Divmmc HWYES    Timex    YES
MultifaceNO     ULAplus  YES
DMA      NO     UART/I2C YES

Move with cursors; SPACE=change
ENTER=accept changes, Q=abort
Fig. 53 – Configuration Options Screen
Note that the screen is broken down into two parts, the top options are always used by NextZXOS while the options in the bottom part are ignored by NextZXOS that does its own enabling and disables/enables hardware configurations according to its needs.
There are a total of 15 personalities available and a few more may become available in a future update pending on core changes, two of which are Native Next modes; one with the standard 48K ROM and one with the Looking Glass 48K ROM which has the distinctive advantage of normal typing instead of tokenised entry. For Next Mode usage however both these are functionally equivalent and both provide access to dot commands in 48K mode.
The Pentagon 128K and TC2048 ones are the most idiosyncratic ones; the first operating only on 50Hz mode and was included to allow access to former Eastern-block countries' specially timed Spectrum Software and the TC2048 being the Timex Portugal partially Spectrum Compatible machine.
An important thing to remember is that for compatibility reasons the expansion bus is by default off; this doesn't mean you can plug in interfaces while the machine is working but that you will not have access to external peripherals unless you explicitly allow it via a series of OUT commands. This is to facilitate the usage of the onboard peripherals and the extra speed afforded by the Next's enhanced Z80n processor. All Next features are available in every mode unless you explicitly turn them off (so for example you need to turn off Timex modes via Configuration as above, if you don't want them) and you must install esxDOS yourselves (see relevant section in Chapter 19 on how to do that) in order to access the onboard divMMC. Remember that the usage of external peripherals will slow down the machine personality to the 3.5MHz speed and only the onboard peripherals support the higher speeds. If you study Chapter 23 and you know the specific ports your hardware uses, you can enable it yourself with a few easy command sequences.
Standard Sinclair BASIC lacks the REG command, so as seen in Chapter 22 you will have to issue a series of OUT commands to enable external peripherals. For example to enable a ZX Printer (or Alphacom 32 or Timex Sinclair 2040) you will need to give:
OUT 9275, 136: OUT 9531, 219:
OUT 9275,128:OUT 9531,128
which disables the DACs on port FBh and immediately turns on the Expansion Bus. (You should however disable it afterwards so you can speed the machine up again).
A slightly different example is the following which enables the Interface 2. This time the relevant commands are:
OUT 9275, 128:OUT 9531,8:
OUT 9275,2 : OUT 9531,1
which does things a bit differently; first we select NextREG 128 (80h) as before but this time we send it a value 8 which, as you can see from Chapter 23, is an instruction to enable the Expansion Bus after a soft reset and not immediately (setting bit 4). The last two OUTs are skipable because the soft reset they initiate can also be done by tapping on your RESET button for less than 1 sec.
Troubleshooting
The Next team has taken every possible precaution and measure in order for your ZX Spectrum Next to live for a long time; inevitably however problems do arise. These are usually not related to the Next and the following paragraphs will hopefully assist you into figuring out quickly what potentially went wrong.
If your screen is blank
- Check that your cables are connected and that your display is on and switched into that input and that your ZX Spectrum Next is powered.
- If the above are working check if you pressed F3 by mistake or the program you're running has switched modes to a frequency your monitor doesn't support (eg. 60Hz). Press NMI + 3 to switch frequencies.
- Verify you don't have a monitor that does 60Hz and you switched to Pentagon timings which only work at 50Hz. Reset the computer and press SPACE upon start to change personalities
- If you have a DVI monitor verify that your converter is working. Many HDMI to DVI converters do not work with the ZX Spectrum Next. Ask other users at the SpecNext forums for tested converters.
- If you connect your ZX Spectrum Next to a TV or an older CRT monitor via SCART, make sure that the line doubler feature is not turned on by mistake. Attempt to remedy by pressing NMI + 2.
If you see a red screen
- Check the version of the core you're running if you see a message saying Core 3.xx.yy required and update your core.
- Check for a mismatched file versioning of NextZXOS. Prepare the SD card anew.
- If the above are okay, replace your SD card with a new card and repeat the process
If your PS/2 keyboard is not working
- Check of in configuration mode, the PS/2 mode is set to Keyboard. Core v.3.00 and later machines have this setting default to Mouse. If you want to use a keyboard, change this to Keyboard and if you want to use both, you will need to set this mode to Keyboard and purchase a Y-Splitter adapter, then plug the keyboard in its appropriate socket.
Other things to look for
Other than the display not being able to support one of the display modes your machine may be in (which is approximately 90% of the cases), the other things to look for is connection/cable problems, SD card media failures or mis-configuration. As a general guideline, we suggest you first study the manual in the relevant sections, and if you still cannot figure out the problem, ask for help in SpecNext's forums, our Social Media accounts and the various groups online. If everything else fails, contact SpecNext Ltd and we'll try to find you a solution quickly!
ZX Spectrum Next User Manual, 3rd Edition (ISBN 978-1-5272-5496-1), written and illustrated by Phoebus R. Dokos. Copyright © 2020-2024 Phoebus Dokos / SpecNext Ltd. Licensed under CC BY-NC-SA 4.0. This is a transcription and can contain errors; check any doubt against the printed page.